
2.1 Distributed Pipeline Server Installation Utility
The Distributed Pipeline Server Installer is a GUI installer that allows you to install and configure 3 types of resources – backend grid management resources (Grid Engine), the Pipeline server, and a number of computational imaging and informatics software tools. After successfully running the installer, you will have a running Pipeline server with grid engine managing jobs on your machine(s), imaging and informatics software tools installed, as well as a set of predefined workflows and modules in your server library.
2.1.1 Requirements
The requirements for the Pipeline server installation can be found on Distributed Pipeline Server Installer page.
Warning: If any of the requirements are not met, there may be unexpected behavior in the installer (e.g. hanging, crashing). If you have any questions, please contact pipeline@loni.usc.edu
A complete installation (including grid engine, the Pipeline server, and all software tools) can take several hours. However, this is mostly because some of the tools take a long time to download (e.g. FSL can take up to 6 hours, depending on your internet speed). If you skip the tools or have already downloaded the ones that require manual download, the total installation time is less than 30 minutes.
2.1.2 Warning
When you run the DPS installation utility to install the Pipeline server, the underlying scripts will edit the firewall rules to open up the Pipeline port for connections from clients. Be forewarned that these changes can cause unexpected results on your system. We recommend backing up your iptables before starting the installation. In the future, this automatic configuration step will be made more robust.
2.1.3 Downloading
Download the installer from the Pipeline website, under Downloads > Distributed Pipeline Server Installer.
2.1.4 GUI
The graphical interface of the DPS utility simplifies the installation experience for the user by hiding unessential details and only asking the user for minimal configuration preferences. The steps are documented below and are accompanied by screenshots.
2.1.4.1 Start the Installer
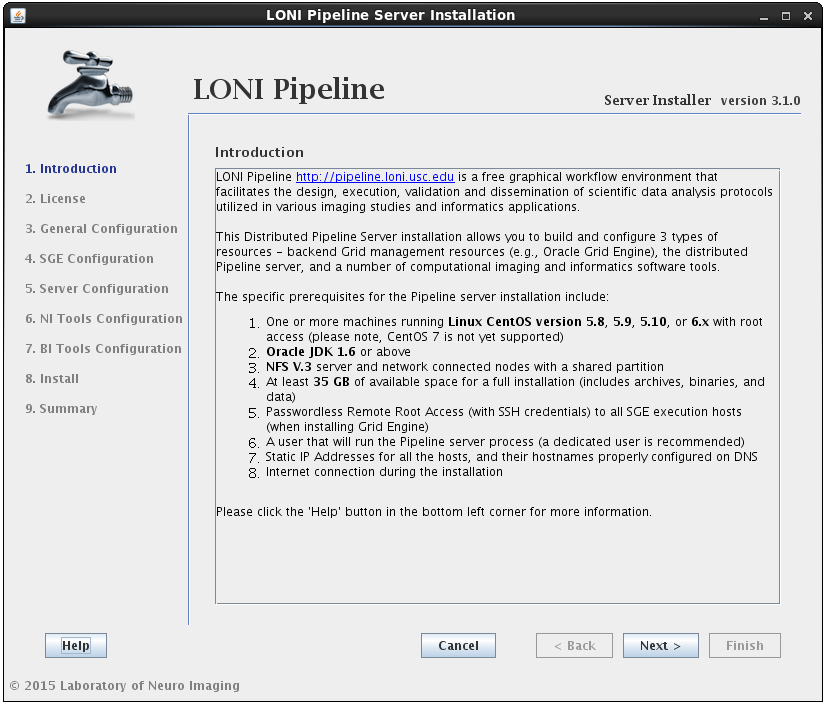
To start the installer, open a terminal, change directories to the directory where the installer file is located, and type
su root (how to become root)
tar -zxvf pipelineServerInstaller.tar.gz
cd pipelineServerInstaller
./launchInstaller.sh
2.1.4.2 Select Components
After reading and agreeing to the license, you will be asked for an installation location and what components you want to install:
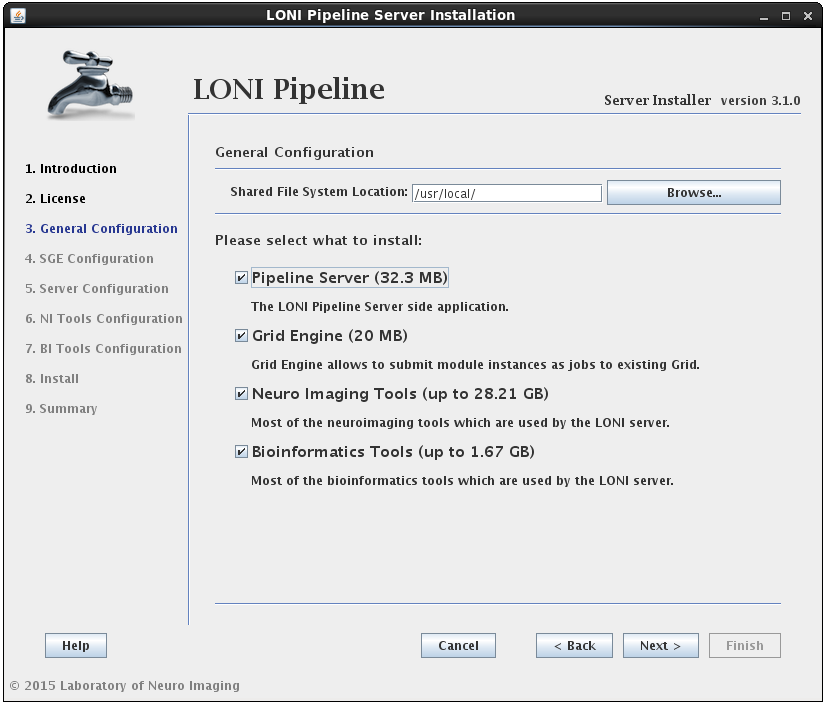
You can select any* or all of the components. It will guide you through all the steps needed for the installation.
* For example, if you have already installed SGE before launching this installer, then deselect the Oracle Grid Engine component. Likewise, if you only want to install the latest tools, you can select the Neuro Imaging Tools component and uncheck the rest.
The installer will verify the Shared File System Location given. It is required to have it on NFS if the server is set to use a grid. The shared file system is used for the Pipeline server to store intermediate files of workflows and to install Grid Engine and Tools.
2.1.4.3 Install Grid Engine
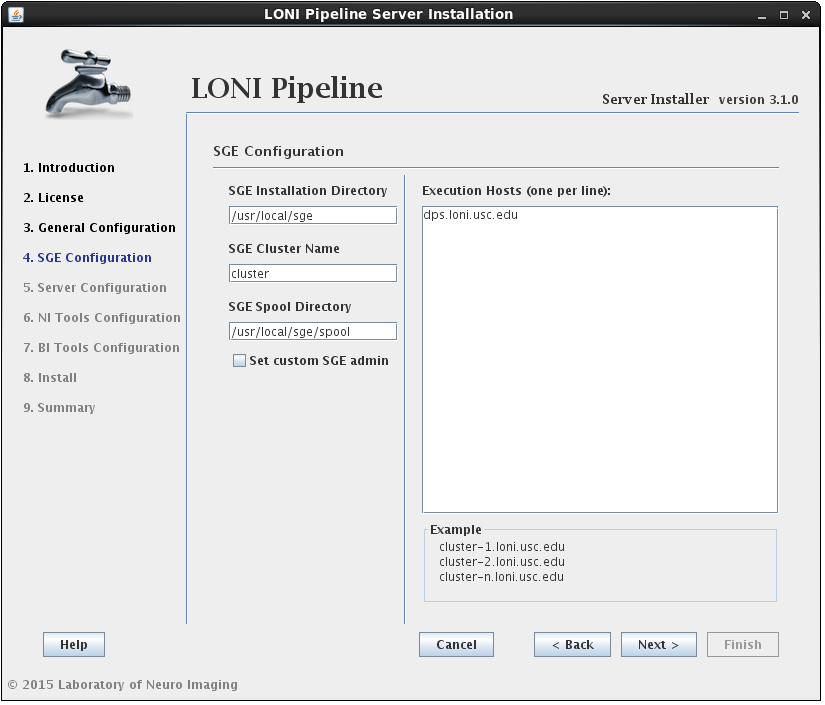
In this section you can configure Grid Engine installation. You can specify an installation location, cluster name (which uniquely identifies a specific Grid Engine cluster), spool directory (for spooling data), and execution hosts (hosts that execute the tasks (jobs)). You can leave installation location, cluster name and spool directory as they are, but you must provide a list of hostnames. You must provide fully qualified domain names, so something like “host1”, “localhost” or “127.0.0.1” is not allowed.
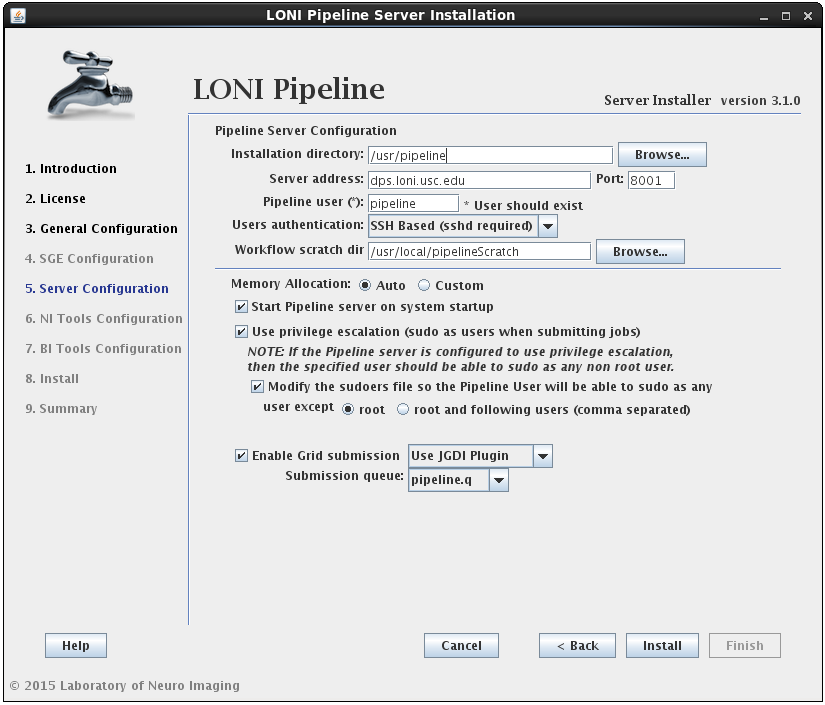
2.1.4.4 Install Pipeline
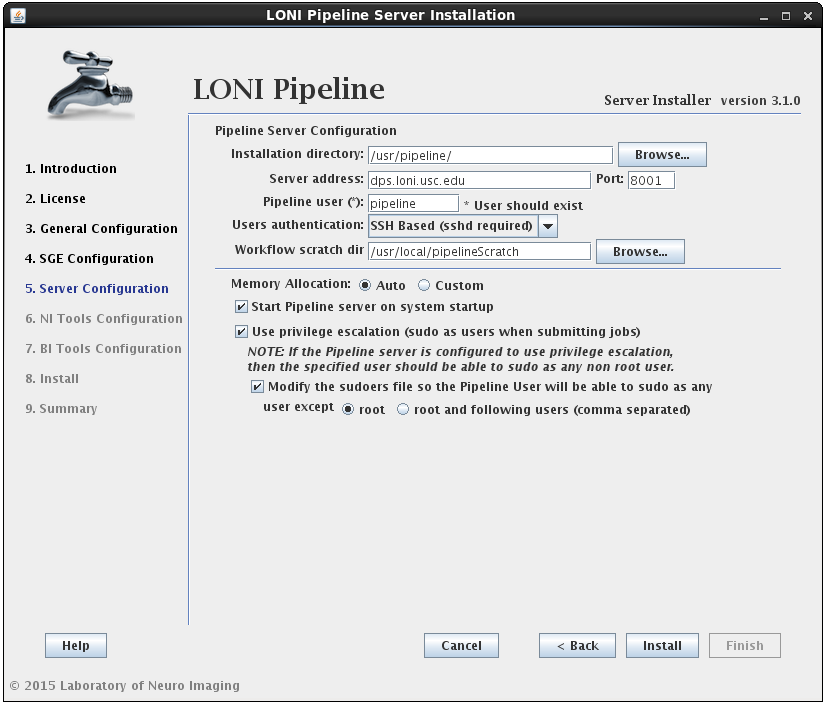
In this section you can configure the Pipeline server. You can specify an installation directory, Pipeline server address, port and user to run the Pipeline server process. The username must already exist and you can have the option to have its sudo file modified to accommodate privilege escalation.
User authentication lets you specify the authentication mechanism for the Pipeline server. If you already have NIS configured (there are plenty of online help resources, e.g. configure NIS server and client), it’s recommended to select the NIS option. Otherwise, you can select SSH Based option, which runs ssh command to test the provided credential. You can also choose No Authentication to let anybody connect to your sever. This option should only be used for testing and on a server with limited internal network access.
If the modify sudoers file option is selected, the installer will modify the operating system’s sudoers file so that the Pipeline server user will be able to sudo as any user, except root and the optional list of users provided. For example, if you have some user that can sudo as root, then this user should be listed as an exception, so that the Pipeline user will not be able to gain root access.
Install Pipeline with SGE already installed
If you already have SGE installed and the SGE_ROOT variable is defined on your system, you can skip SGE installation by unchecking the Oracle Grid Engine checkbox from step 3 (General Configuration). The Pipeline configuration window will now have an additional checkbox to “Enable Grid Submission” which needs to be selected if you want to use Pipeline with your pre-installed SGE.
Upon checking the “Enable Grid Submission” checkbox, you will need to select a grid plugin. In order to communicate with SGE, Pipeline uses Grid Plugins. LONI provides two plugins for SGE: JGDI Plugin and DRMAA Plugin. If you are using SGE we highly recommend using JGDI Plugin as it supports more Pipeline features and is more reliable. You can choose DRMAA Plugin if you have other DRMAA supported Grid Manager installed and want to integrate Pipeline with it.
The last step is to choose the submission queue. The installer will list all of your available queues and you have to pick one for Pipeline. If you don’t have a special queue already set up for Pipeline then you can use the default queue of SGE (all.q). If you do not have any queues defined in SGE, you will have to create one yourself.
Installing Pipeline without SGE
If you don’t have SGE installed, and you uncheck the Oracle Grid Engine checkbox from step 3 (General Configuration), the installer will install Pipeline without Grid Engine. All jobs submitted to the Pipeline server will run locally on the server. You have to be careful with number of jobs submitted to the server as high number of jobs will negatively affect the server’s performance. Please see Maximum number of threads for active jobs if you want to set limits on the number of parallel running jobs.
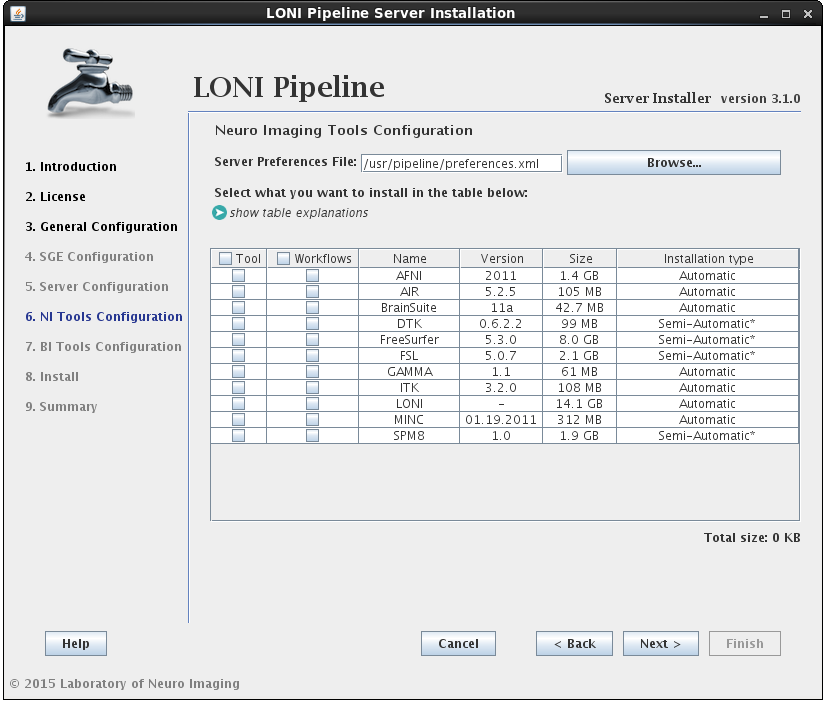
2.1.4.5 Install Neuro Imaging Tools
In this section you can select which imaging software tools and server library files to install.
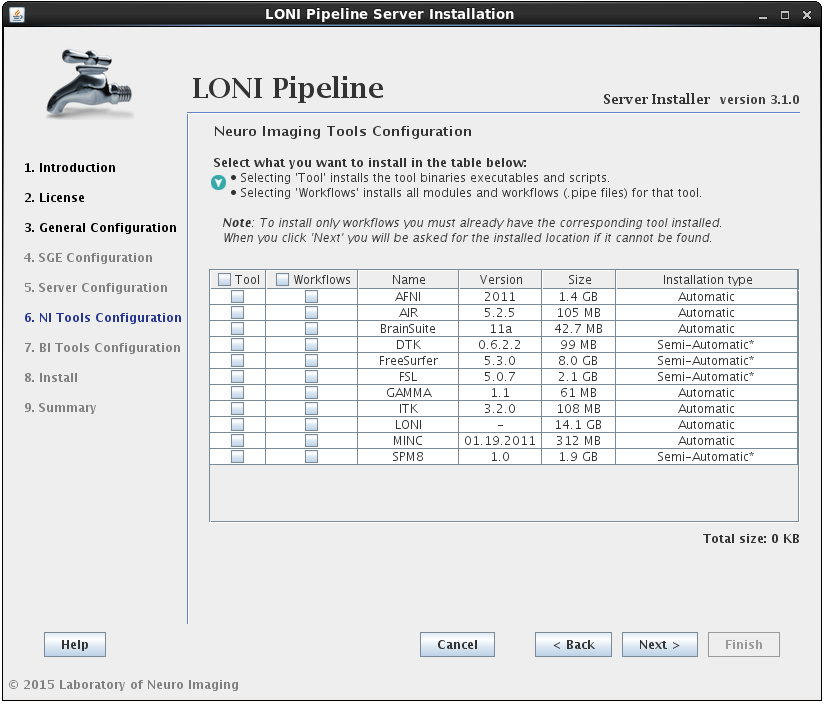
There are two components that can be selected for each NeuroImaging tool:
• the tool itself (binaries, executables, and scripts)
• the modules/workflows (.pipe files) associated with that tool.
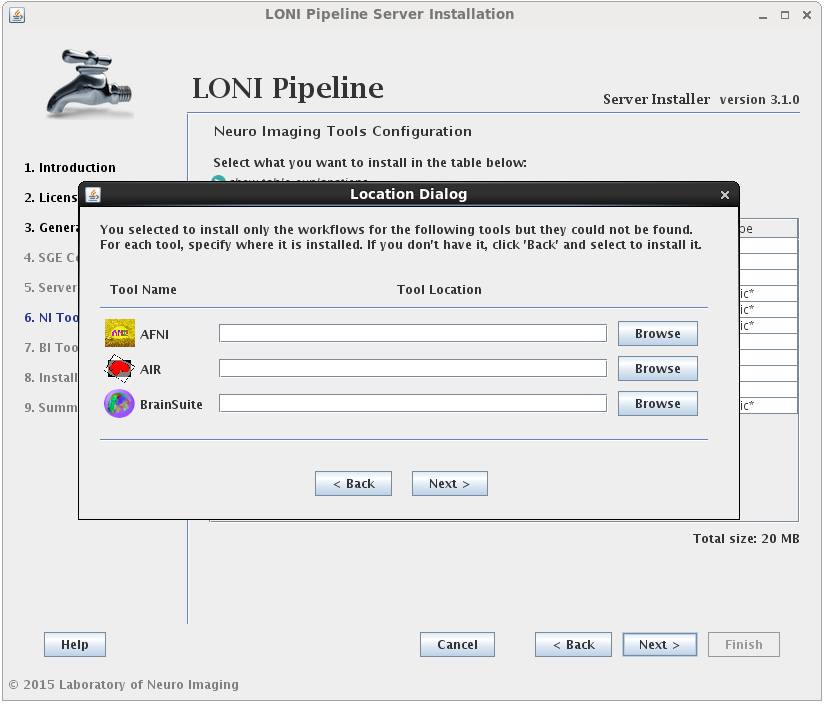
You may select either or both options for any tool, but please note that you can only install workflows for tools that are already installed or you have selected to install.I f you select to install the workflows for a tool but not the tool itself, and the tool cannot be found in the default installation directory (shared file system path + “tools”) then you will be prompted to provide where that tool is installed (second image). If you find yourself here by mistake, click back and modify your selection.
If the installation type for a tool is “Automatic”, it will be installed automatically without the need for user input. Some tools are marked as “Semi-Automatic” (e.g. FSL and FreeSurfer), which means that they require you to manually download the installer files for that tool from the developer’s website. This is because of the licensing restriction imposed on the software. For these types of tools, you will be shown a window after clicking ‘Next’ which contains instructions on what website to visit, which files to install, and any other requirements for that tool.
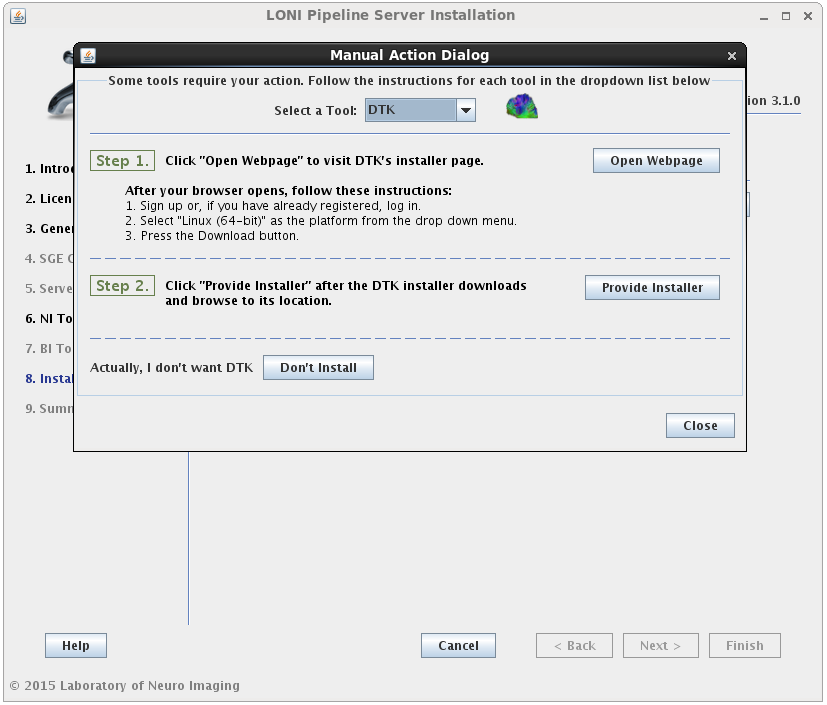
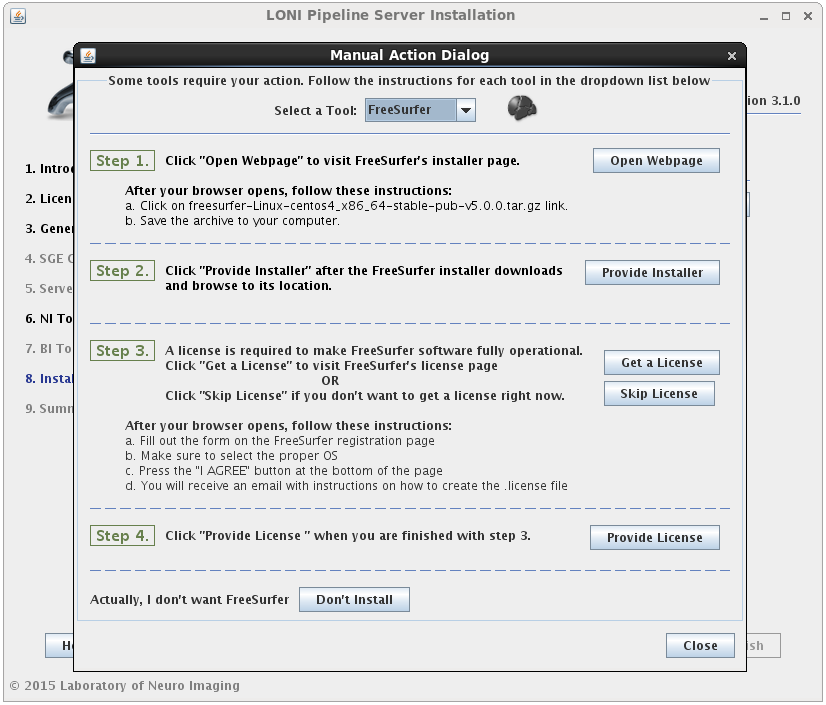
When you satisfy all the requirements for a tool, it will begin installing in the background immediately. A green check mark will appear next to that tool in the drop menu, indicating that you have provided the necessary information and can move on to the next tool. You may preemptively cancel the installation of a tool by clicking the ‘Don’t install’ at the bottom of the window. When all tools are either installing or cancelled, this window will close automatically.
Install the tools without installing Pipeline or SGE
If, at a later time, you want to install updated versions of some tools, you can have it installed without installing the Pipeline and/or SGE. Simply check only the NeuroImaging Tools in the general configuration section of the installer, then click Next and it will go directly to the tools installation step, skipping the Pipeline and SGE installation steps.
Please note that NeuroImaging tools can only be installed if you also selected to install the Pipeline Server or already have the server installed. If you select to install these tools without selecting to install the server, and the preferences.xml file cannot be found in its default location, a browse button will appear so that the location to your preferences.xml file can be provided. If you don’t have a preferences file, it means you have not installed the server yet and it should be selected during the installation process.
2.1.4.6 Install Bioinformatics Tools
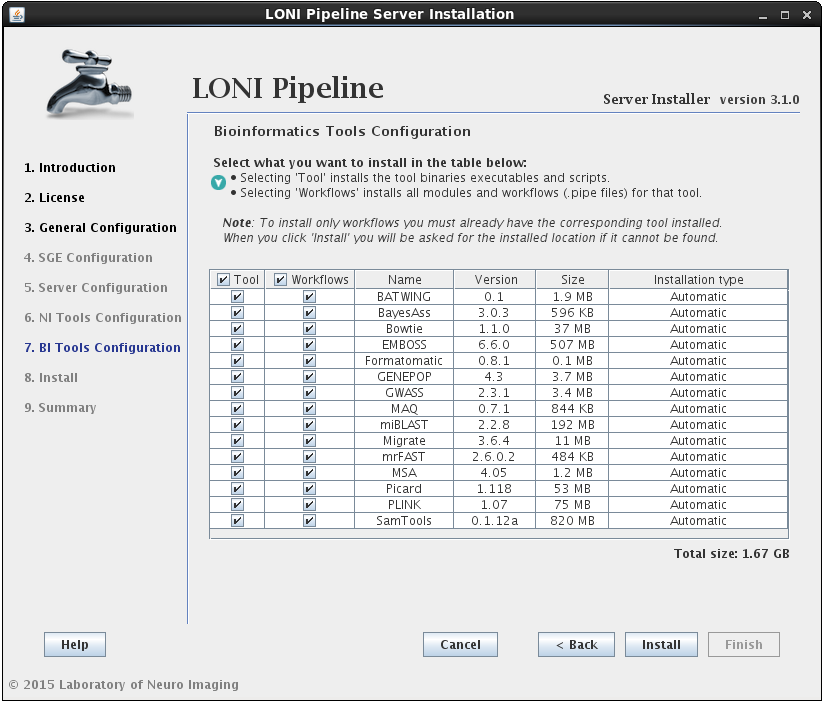
The process for installing Bioinformatics Tools is the same as NeuroImaging (outlined in the previous step) except there are currently no “Semi-Automatic” tools in this section. Note this is the final step before the Pipeline installation utility takes over and starts to download/install files so only hit ‘Install’ if you are sure that all of your previous settings are correct.
Install the tools without installing Pipeline or SGE
Just as with NeuroImaging tools, Bioinformatics tools can only be installed if you also selected to install the Pipeline Server or already have the server installed. If you select to install these tools without selecting to install the server, and the preferences.xml file cannot be found in its default location, a browse button will appear so that the location to your preferences.xml file can be provided. If you selected NeuroImaging tools as well and already indicated the path to your preferences file in the NI Tools Configuration panel, you will not see this button.
2.1.4.7 Finish Install
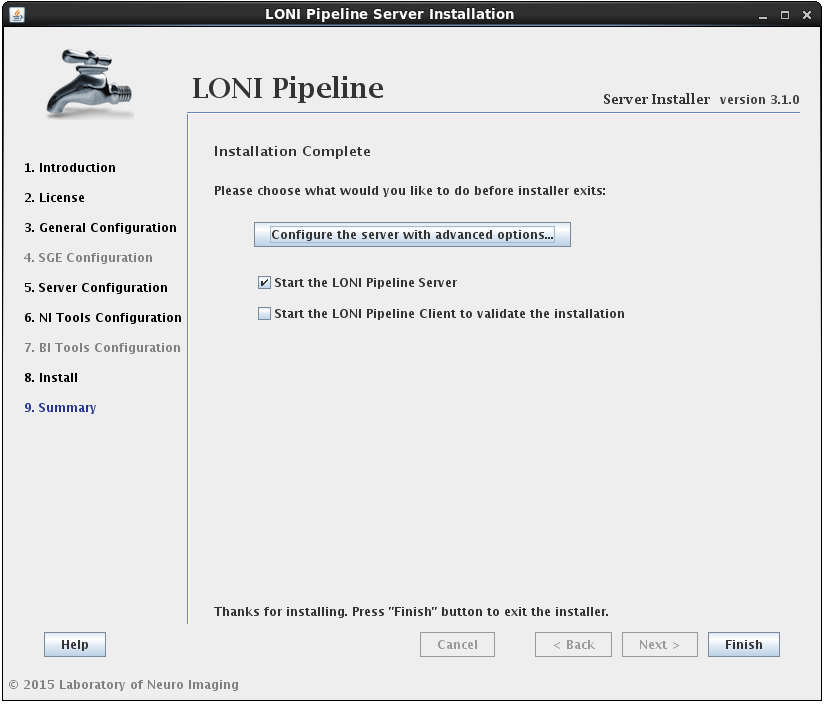
After the installation has successfully completed, you will be shown a summary screen. Clicking the Finish button with “Start the LONI Pipeline Server” checked will exit the installer and launch the Pipeline server. You can also check the “Start Client to validate the installation” option to launch the client and test run a workflow.
Additionally, you may want to configure advanced server preferences by clicking on “Configure the server with advanced options…”. This will automatically open the server configuration tool, where you can edit the details of your server.
If you have any questions, please contact pipeline@loni.usc.edu
2.1.4.8 Start the Server
If you checked the “Start the LONI Pipeline Server” option on the summary page of the installation, the Pipeline server process will be started. To check the logs of the Pipeline server, go to the Pipeline server’s directory (/usr/pipeline by default), specified in the Install Pipeline step. You will find files called outputStream.log and errorStream.log, which store output and error stream information. You can verify if the server started successfully by checking the contents of the outputStream.log file. It should look something like this:
[ 1/6 ] Connecting to Persistence Database..............DONE [117ms]

[ 2/6 ] Starting server on port 8001....................DONE [1152ms]

[ 3/6 ] Loading server library..........................DONE [31ms]

[ 4/6 ] Loading server packages info....................DONE [7ms]

[ 5/6 ] Checking to resume backlogged workflows.........DONE [0ms]

[ 6/6 ] Checking to resume active workflows.............DONE [0ms]

[ SUCCESS ] Server started.
You can stop and start the Pipeline server by calling (root access required):
/etc/init.d/pipeline stop
/etc/init.d/pipeline start
The Pipeline and persistence database will be started/stopped in order, and the pipeline user will run these processes.
If you don’t have root access, you can stop and start the Pipeline server as the pipeline user. It will be equivalent to the init.d method above. To stop and start the Pipeline server, go to the Pipeline server’s directory and type
./killServer.sh
./launchServer.sh
Always check if the server has started successfully by viewing the outputStream.log file. If it shows error on persistence database, you can stop and start the persistence database process by typing:
./db/stopDB.sh
./db/startDB.sh
After the persistence database has been restarted, restart the Pipeline server as noted above.
2.1.5 Command Line Installation
An alternative to using the GUI to install the Pipeline server is an automated method that relies on a configuration file. All of the fields that are entered via the GUI are represented within a hierarchical XML file. A default configuration file is included in the distribution directory (dist/install_files) of the installer, which you can download here). After you set up your configuration file, you can run the installation in automatic mode by typing the following into your shell:
tar -zxvf pipelineServerInstaller.tar.gz
cd pipelineServerInstaller
./launchInstaller.sh -auto dist/install_files/DefaultInstallationPreferencesFile.xml
A complete template for the XML file can be found here. If you use this template as a starting point, note that it has a lot of placeholders and is not set up to run “as is”, so you would have to make many modifications. For reference, each of the tags is documented below:
- DistributedPipelineServerInstaller: root tag, contains all other tags
- SharedFileSystemPath: path to a directory that is shared (via NFS) between the host running the Pipeline server and qmaster, admin, and execution hosts of SGE
- JDKLocation: only include this tag if you don’t already have Oracle JDK running on the host where you’re installing the Pipeline server; the value should be the path to the JDK RPM, which you can install from the Oracle page
- PipelineServer: use attribute enabled=”true” to indicate that you would like to install the Pipeline server; the children of this element will specify information about the server installation
- InstallLocation: specifies location where Pipeline server is to be installed
- Hostname: specifies the hostname of the host where Pipeline server is being installed
- Port: specifies port on which the Pipeline server will be accepting connections from clients
- Username: specifies user that will be running the Pipeline server
- TempDir: specifies a directory where Pipeline modules will write intermediate files
- ScratchDir: specifies a scratch directory where sample workflows will write their outputs; this value then becomes available to users through the pre-defined ${tempdir} variable, documented here
- GridSubmission: use attribute enabled=”true” to indicate that you would like the Pipeline to submit jobs via grid engine to execution hosts; otherwise, the jobs will be run locally on the host running the Pipeline server
- GridPlugin: options are JGDI or DRMAA
- GridSubmissionQueue: the SGE queue where Pipeline should submit its jobs
- UsePrivilegeEscalation: options are true or false; privilege escalation is documented here
- DBInstallLocation: path to a directory where you would like to install the Pipeline database; if it doesn’t exist, it will be created by the installer
- StartPipelilneOnSystemStartup: set value to true if you would like to configure the system to start the Pipeline server on startup; false, otherwise
- AuthenticationModule: options are SSH, NIS, and NoAuth; these are documented here
- ModifySudoers: use attribute enabled=”true” to indicate that you want to add the Pipeline user to the sudoers list
- SuperUsers: comma-separated list of users that you don’t want the Pipeline server to sudo as (default: root)
- MemoryAllocation: specify the amount of memory you would like to allocate to the Pipeline server/database, in megabytes
- PreferencesPath: if the Pipeline server is not being installed (i.e., the PipelineServer element is missing or has attribute enabled=”false”), then the user must specify the path to the Pipeline server preferences file (by default, the path is /usr/pipeline/preferences.xml); if the Pipeline server is being installed, you can omit this element.
- SGE: use attribute enabled=”true” to indicate that you would like to install Son of Grid Engine; the tags that follow will describe some of the preferences for the installation; you can find documentation on SGE here
- SGERoot: path to directory where you would like to install SGE (default: /usr/local/sge)
- SGECluster: name of cluster that you would like to install (default: cluster)
- SubmitHosts: specify hostnames of machines which will be configured to handle job submission and control; you can do this using one hostname per Host element, as children of the SubmitHosts element
- ExecHosts: specify hostnames of machines which will be execution hosts; use same format as for SubmitHosts
- AdminHosts: specify hostnames of machines that will be used for SGE administration purposes; use same format as for SubmitHosts
- AdminUsername: user that will serve as SGE administrator
- SpoolDir: path to a directory that will be used for spooling during installation
- Queue: use attribute configure=”true” to indicate that you would like to configure a queue at the end of SGE installation; this is documented here
- Name: the name of the new queue that you would like to configure
- Hosts: the hosts that you would like to add to the queue
- Slots: the slots that you would like to add to the queue (the difference between hosts and slots is documented here)
- Tools: use the attribute enabled=”true” to indicate that you would like to install some tools; also use the path attribute to specify the directory where you would like to install the tools (note that this should be in an NFS-shared directory)
- NeuroImagingTools: use the attribute enabled=”true” to indicate that you would like to install one or more NeuroImaging tools; true/false values for the all_executables and all_serverlibs tags indicate that you want to install the executables and/or .pipe files for all NeuroImaging tools, regardless of what values each tool is set to.
- Available neuroimaging tools: AFNI, AIR, BrainSuite, FSL, FreeSurfer, LONI, MINC, ITK, DTK, GAMMA, and SPM; for each of these, the executables=”true” attribute is used to activate the tool installation and the serverlib=”true” attribute is used to activate the .pipe files for that tool; note that FSL, FreeSurfer, and DTK require that the user specify a sub element, namely ArchivePath, whose value is the path to the archive file, downloaded manually from the software website.
- BioinformaticsTools: same attributes as NeuroImagingTools tag
- Available bioinformatics tools: EMBOSS, Picard, MSA, BATWING, BayesAss, Formatomatic, GENEPOP, Migrate, GWASS, MrFAST, Bowtie, SamTools, PLINK, MAQ, miBLAST; again, the enabled attributes can be used to indicate activation or deactivation of installation for each of these elements
2.1.6 Troubleshoot
The following is a list of common problems and explanation:
– The provided directory seems not to be a network file shared (NFS) directory.
The installer will verify the Shared File System location given. It is required to be on NFS if the server is set to use a grid. The shared file system is used for the Pipeline server to store intermediate files of workflows and to install Grid Engine, NeuroImaging, and Bioinformatics Tools.
– For a Grid Engine installation, the local hostname cannot be “localhost” and/or the IP address is like 127.0.*.*
You must provide fully qualified domain names as hostnames (such as “host1″); “localhost” or “127.0.0.1″ is not allowed.
– Cannot enable Grid submission as SGE doesn’t have any queue.
If you do not have any queue defined in SGE, you have to create one yourself and recheck “Enable Grid submission” checkbox and select the queue.
– Why I can’t connect to the server?
If you have the Pipeline server running but you can’t have your client connect to it (shows “Server not found” message), you need to check your firewall settings and enable port 8001.
– Why is my first workflow taking so long?
When you have SGE installed and you submit jobs for the first time, it may take a long time to get the jobs running. This is because initially the SGE sees the compute nodes loaded heavily, but as time passes, the loading information will be updated more accurately.
2.2 Conventional Installation (without DPS utility)
If you’d like to install the Pipeline server by hand, here are some instructions on how to get started. Note that if you choose this route, you’ll have to carry out quite a bit of configuration on your own. This is only recommended if you’ve done it before or have a thorough understanding of the inner workings of the Pipeline server. Otherwise, use the DPS utility.
2.2.1 Requirements
The Pipeline server can run on any system that is supported by JRE 1.6 or higher, so the first thing to do is head over to the official Java website to download the latest JRE/JDK. If you run the server on Windows, you will not be able to use privilege escalation (you might not even need/want it). Also the Failover feature is only supported by Unix/Linux systems. All other features are available for all platforms.
The amount of memory required varies based on the load you will expect on the server, but for a reference point, as of summer 2010, the main Pipeline server running at LONI has been set to accept a max load of 620 jobs, and its memory footprint hovers between 50-300MB depending on the load and garbage collection scheme.
2.2.2 Downloading
Head over to the Pipeline download page and download the latest version of the program for Linux/Unix. The server and the client are both in the same jar file, so you only need to change the Main entry point when starting up the server. Extract the contents of the download to the location you want to install the server at.
2.2.3 Starting the server
Now let’s start the server for the first time. Get to a prompt and switch to the directory where you copied the Pipeline.jar and lib directory and type:
$ java -classpath Pipeline.jar server.Main
Assuming you have java in your path, you should have received the following message back in your terminal window:
[ 1/6 ] Connecting to Persistence Database..............DONE [61ms]

[ 2/6 ] Starting server on port 8001....................DONE [747ms]

[ 3/6 ] Loading server library..........................DONE [336ms]

[ 4/6 ] Loading server packages info....................DONE [2ms]

[ 5/6 ] Checking to resume backlogged workflows.........DONE [46ms]

[ 6/6 ] Checking to resume active workflows.............DONE [0ms]

[ SUCCESS ] Server started.
That’s not enough to have a fully functional server yet, but we’re a step closer, so go ahead and break out of the process by hitting Ctrl-C and then let’s begin configuration process.
| Previous: 1. Introduction | Table of Contents | Next: 3. Configuration |


 Open full screen in a new window