
- Dragging in modules
- Connecting modules
- Setting parameter values
- Data sources and data sinks
- Cloud sources and cloud sinks
- Adding Metdata
- Conditionals
- Web service modules
- Transformer module
- Remote file browser
- Processing multiple inputs
- Enable/Disable parameters
- Annotations
- Variables
- IDA
- NDAR
- XNAT
- Cloud storage
- Server changer
For this example, we’re going to build a workflow from modules provided to us by the LONI Pipeline server. You don’t need to use the LONI server to create workflows though, and you can make your own modules as described later in this guide. First, open a new workflow by going to File->New.
4.1 Dragging in modules
Go to the server library at the left and expand the ‘AIR’ package. Click on the ‘Align Linear’ module and drag it into the workflow canvas that you just opened. Next drag in the ‘Reslice AIR’ module under the same package. Your screen should something like this.

Please note that in the current release of the LONI Pipeline, all modules that are used in a workflow must be either from the same server (remote or locally), or a pair of a remote server and your local machine (i.e. localhost). For example, you can mix modules from the LONI Pipeline server and your local machine, but you cannot mix modules from the LONI Pipeline server and modules from the Acme Pipeline server.
4.2 Connecting modules
Each module in a workflow can have some inputs and outputs. The inputs are on the top, and the outputs on the bottom. Go ahead and connect the output of the ‘Align Linear’ to the input of ‘Reslice AIR.’
When you attempt to make a connection, the Pipeline does some initial checking to make sure the connection is valid. For example, it won’t let you connect a file type parameter to a number type parameter, or connecting an output to another output and more.
Side note: the Pipeline supports the connection of a single output parameter to multiple input parameters, as well as the connection of multiple output parameters to a single input parameter. In the first case, the value of the output parameter is simply fed into all of the subsequent input parameters. In the latter case, the multiple outputs are all executed as a part of one command using the input parameter module’s executable.


4.2.1 Smartline
Smartline is an automatic file conversion tool. Based on information about input and output, a Smartline can be drawn which takes care of any file translation needed. It is enabled by default, and you can disable it in your Preferences.

When Smartline is enabled and you try to make a connection between different image formats, for example Analyze Image (.img), NIFTI (nii) or MINC (mnc), you will see “Smartline” is prompted at the end node. After you release the mouse click, a Smartline will be drawn. You will notice it is different in appearance from the regular line, as it has an extra converter module to do format translation. You can always replace an existing Smartline with a regular connection by right click Smartline and “Disable Smartline”. It will delete the Smartline and draw a regular connection if the file format of input and output matches. In addition, you can hold the “Shift” key when you draw lines, which overrides your saved Smartline mode temporarily, i.e. if you disabled Smartline in preference, it will try to draw a Smartline, if you have Smartline enabled in preference, it will try to draw a regular line.
4.3 Setting parameter values
Now we need to set the values of each of the input parameters on the ‘Align Linear’ module. Double-click on the left most parameter and select an image atlas. This is a neuroimaging specific file type so you may not have one. You can double-click on each parameter afterwards and enter a value for each one.
Once you’ve set the inputs of ‘Align Linear’ you’ll want to specify a destination for the output of the ‘Reslice AIR.’ Double-click on its output parameter and specify the path and a filename you want the file to be written to.

Note that you can mix data that is located on your computer and the computer that the server resides on, and the Pipeline will take care of moving data back and forth for you. For example, the input to the ‘Align Linear’ could be located on your local drive, but you could set the output of the ‘Reslice AIR’ to be written to some location on the Pipeline server or vice versa.
4.4 Data sources and data sinks

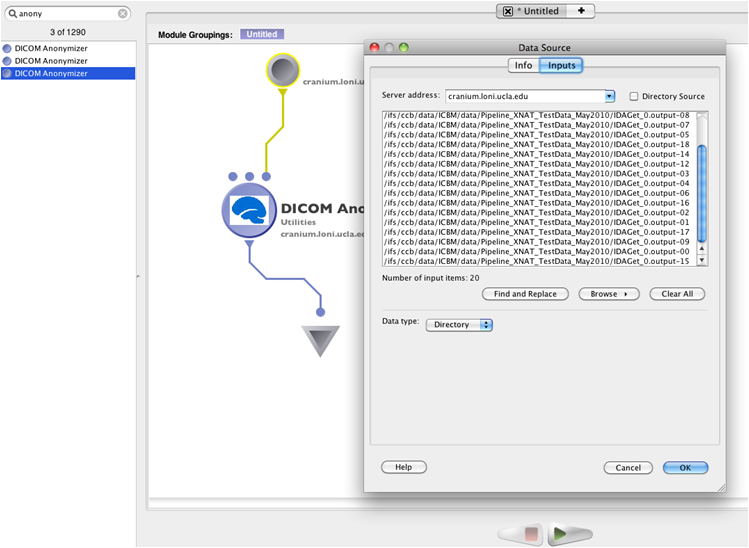
Sometimes you will want to use a single piece of data as an input to multiple modules in a workflow, or you just want to make the workflow easier to understand. In these cases you can take advantage of sources and sinks. Just right-click on any blank space in the workflow canvas and select New > Data source… In the dialog that opens enter some information about the data source, and then click on the ‘Inputs’ tab. From here, you can click on ‘Browse’ under the text area and browse and select multiple files into the list, or you can just type in the path to a file manually. You can click ‘Find and Replace’ button to do search and replace on your input data. Note that at the top there is an option for a server in case you want the data source to represent data on another computer.
Using this same method, you can right-click on the canvas and select New > Data sink… for use in your workflow. If no data sink is specified, output files will be in the temporary directory, with system generated filenames. You can specify the output filenames and location in a data sink and connect to the output of the module, the file will be generated specifically on that destination. Starting from version 5.1, files in data sinks are not copied over from temporary directories, but rather generated directly at the module’s execution time.


Sometimes you want to just specify a target directory without specifying each file individually. Data source and data sink let you do this. For Data Source, select Directory Source and specify desired directory. Optionally, you can put filters so that only filenames inside the directory that meet the filter will be included. You can also specify file types, which filter based on file extensions. You can also check Recursive checkbox, which lets you search through sub-directories recursively. After connecting this Data Source to input of other modules, files in this directory that meet the filter’s condition will be feed as input. For Data Sink, select Directory Dump and specify desired directory, then all output files connected to this Data Sink will be copied to this directory.
4.5 Cloud sources and cloud sinks


Cloud sources and sinks are similar to regular data sources and sinks, except that data are stored in the cloud. LONI Pipeline will take care of the data transfer between the cloud vendor and the compute nodes. To use cloud sources and sinks, you need to link your cloud account instructed here. You only have to do this once; the authentication tokens are securely kept for your convenience. You can unlink/revoke Pipeline’s access to your cloud account anytime from either Pipeline’s Tools > Cloud Storage window, or from your cloud vendor account settings.
To use your data in cloud as input, simply right-click on any blank space in the workflow canvas and select New > Cloud source… In the new dialog, you can specify vendor (if you have linked multiple vendors), and you can specify input by clicking Browse & Add… A file chooser window will open up with files in your cloud. You can specify one or multiple files. You can specify Pipeline server location to stage these files. Please note for Dropbox, only files in /Apps/LONI Pipeline/ can be accessed by the LONI Pipeline.
To write Pipeline output to the cloud, simply right-click on the canvas and select New > Cloud sink… Specify vendor, paths and servers. Please note that Amazon S3 and Dropbox are supported vendors of cloud sinks.
4.6 Adding Metadata
The “add metadata” button is a feature inside regular data sources that extends its functionality, allowing you to incorporate imaging data and non-imaging meta-data together, enable queries groupings, and construct study-designs based on user-specified criteria. Both the imaging data and the metadata information are passed to subsequent modules throughout the pipeline workflow in data-metadata pairs generated by the Pipeline. You can inspect the metadata for any module’s output under the module output files panel. The metadata can be read and fed to any module (Data Extraction), and values produced by any module can be added back to the metadata (Metadata Augmentation). The metadata may be used for setting up various conditional criteria in Conditional modules. The metadata information may be represented as an XML file, as long as it’s schema is valid (well-formed) and consistent (uniform for every subject in the study), or as a tabular spreadsheet (CVS).
First create a regular data source, then double-click the data source and click “Add Metadata”. Two new tabs will appear next to the Input tab.
4.6.1 Input data tab

 This is very similar to the data-input mechanism in data-sources but has several additional components. It has two new text areas, one on the left that is used to input the data files, and the one on the right, used to input the corresponding metadata files. These two fields are formatted in such a way that the files listed in both areas are paired with each other and are listed in the same order. For example, line #1 in the data field is linked to line #1 in the metadata field and corresponds to subject/input #1; line #2 in the data field is linked with line #2 in the metadata field and belongs to subject/input #2; and so on. By selecting a file in either of the two fields (data/metadata) automatically selects the corresponding file in the other filed for ease of viewing.
In addition to the default view (separated view), there is also an option to merge the 2 windows and create a single text area. In the merged view, the data file and the meta data file pairs are listed on each line separated by a semicolon. The merged view is very useful when both data and metadata files have to be edited at the same time like deleting several entries, copy and paste entries, find-and-replace, etc. Switching between the 2 views is very simple (view mode option on the study module “data” window is used to switch between views) and can be done at anytime.
There are also several other options on the Data tab,
• Find and Replace: used to find a specific value and replace it with user specified value in both the data and metadata sections.
• Add Data, Add Meta Data: used to input files that are locally or remotely located.
• Clear list: used to delete everything listed.
• Number of Input items: lists the number of inputs specified by the user. A mismatch error will appear if the number of data files is not the same as the number of meta data files.
• Data type: the type of data entered can be specified using this option. It can be a directory, file, number, string, or enumerated. There is no type selection for metadata since the design supports only XML file format.
There is an Import Data option next to the Server address option. This allows the user to create a study module by importing data from directories or by specifying the file paths that exist on any of the LONI servers or on the user local machine. The Pipeline automatically matches the data and metadata files and creates a study module. This option can be used only if the data and the meta data organization on the servers follow predefined rule or format such as,


• Filename matching rule takes a directory, finds all files under the directory and matches data and metadata that have the same core name. By selecting “Recursive” all subdirectories are recursively searched. In order to restrict the search to only certain type of data, type of file option can be used. Filters can also be used to restrict the search based on some criteria.
• Derived from metadata rule takes a list of metadata files, derives data path from an element of the metadata and matches the metadata with the derived data. In order to do this, a directory path that contains these metadata files and the element name that contains the data path has to be specified. As for the filename matching rule, recursive and the filter options can also be used.
• Derived from CSV rule takes a CSV file that contains list of subject data information in a special format. The first row in this file corresponds to the column names/heading. Any information that is required about the subject could be listed in each column but the paths to the data file for each subject must always be listed. Starting from the second row each of the subject information is listed, one subject per row. The Pipeline reads the CSV file and automatically creates one metadata file for each subject and derives the paths to the corresponding data files as well.
After the rule and the required information is chosen, clicking on the Show Items button under the Import Data checkbox will list the data and the corresponding metadata files that matched the specification in viewing text window, file type is selected based on the file extension.
4.6.2 Grouping tab

Once the input data and the metadata files are selected, various groups, populations cohorts and strata can be created based on some meta-data criteria. There are two areas under the Grouping tab (similar to the Data tab), the left section lists all the metadata files specified under Data tab, and the right section lists the groups once they are defined.
A group can be created by clicking on the “New Group” option and specifying a group name. The group name can be changed later by right clicking on the group name. Clicking on one of the Group names, a new field appears at the bottom of the window used for specifying the grouping criteria – what metadata condition specified group-membership.
The grouping criteria follow the format of WHERE clause of XQuery (URL-REFERENCE). It contains several simple boolean operators. The Pipeline queries each of the metadata files based on the user-specified criteria and returns a boolean result. If true, then the imaging data file associated with the metadata-data item will be added to the group. The operators are, ,: comma, >: greater than, >=: greater than equal to, <: lesser than, <=: lesser than equal to. Single quotes must be used for a string value and there is no need for quotes for specifying numbers.


Before setting up the criteria for a particular group, a specific element in the metadata has to be identified. Once this is done the element has to be defined using XPath. To specify the XPath, the XML file on the left side of the 2-pane window is selected by double clicking on it, which causes an XML tree viewer to pop up. By selecting any element in the XML file, a path appears at the bottom of the window and this is the XPath. Once this is determined, the element can be defined by clicking on Add as variable and specifying a simple name for the element. This new element can be used to set up any conditional-expression criteria for any group that is created. Multiple variables can be defines as long as their names are unique. To view the list of variables, in the Menu bar, select Window > Variables. To use a variable and set up a criterion, curly brackets are wrapped around the variable name (e.g. {varAge}>56).
Under the grouping criteria conditions similar to the following example can be used,
{CDRSCORE}>=1 and {GENDER}=’F’, where
• CDRSCORE and GENDER are variables defined,
• >=, < are boolean operators,
• and/or represent conjunctions and disjunctions.
Multiple conjunctions and disjunctions can be used. Using parentheses (), explicitly specifies operation precedence, anything inside parentheses is evaluated first.
Once the grouping criteria are defined, clicking on the Update button will save the criteria and will display the result. Members satisfying the criteria will be listed under this group and the total group size will also be visible in the right pane. At any time, clicking on the Reload button all groups will updated and will display the results of the conditional expressions. A group can be deleted by pressing the Delete Group button.
 Another way to define and create a group for certain elements in the metadata file is the following: to create 2 groups based on whether the subject is male or female, one can select the element gender/sex in the metadata file, add the XPath as variable and click on Generate Groups option. A new window appears where the name of the variable ({gender/sex}) is entered. Two groups, Male and Female are automatically generated after clicking OK. Another example where this feature is useful is when the dataset has multiple groups, patient type1, patient type2, control subjects and so on. By selecting the corresponding element in the metadata file that defines the subject group type, one can use the Generate Groups option to easily create as many groups as the number of distinct values for that element.
4.6.3 Matrix tab

The Matrix tab provides a customized table view of all the metadata or multiple metadata elements chosen from the study. Multiple metadata elements can be selected by specifying the XPath or the variable for the XPath (separated by commas). Each column in the table corresponds to a metadata element (same order as specified) and each row corresponds to the subjects (same order as specified in the Input data tab). XML tree viewer’s “Add as matrix column button” can also be used to add more metadata elements to the table. Clicking on the Generate Matrix button, a table containing these results will be generated. The table can be sorted by clicking on the header of any column and can be exported to a CSV file by clicking on the CSV file button.
You can also save metadata of the study module as a flat CSV file. Click Save metadata as CSV… button, choose filename, and click OK. One metadata will be saved as one row in the CSV file. The first row in the CSV file will be headers. The first three columns in the CSV file will be index, data value, and metadata path of the study module. Missing value will be treated as empty value (nothing between two commas).
4.7 Conditionals
Conditional module is used when the execution path of various inputs to a workflow is dependent on some criteria. Use of Conditional Modules makes the workflow more dynamic. Conditional module can be created by right clicking on the empty area in any workflow and choosing “Conditional” under the “New” option. A new dialog will appear that has three tabs. The first and second tab is similar to what is seen in other type of modules. The third tab is different and is called “Conditions”. Under this tab there is a “Condition source code” section where the conditional criteria should be entered. The syntax of the code entered is the same as the Pipeline Programming Language (PPL), which is similar to Java/C. Pipeline programming language is very simple and easy to learn.


Pipeline programming language supports following functions
Supported functions
| Function name | Parameter type | Description |
| exists() | File | Tests whether the file or directory denoted by parameter’s path exists. |
| isdir() | File | Tests whether the file denoted by this parameter’s path is a directory |
| length() | File | Returns the length of the file denoted by this parameter’s path. |
| hasMetadata() | All types | Tests whether the parameter value has metadata |
| runXQuery(“”) | All types | Given a string of the ‘where’ clause of the XQuery language, returns boolean result of the query |
| belongsToGroup(“”) | All types | Given a string of group name defined in the Study module, tests whether the parameter belongs to the group |
| getElementValue(“”) | All types | Returns the value of an XML element identified by the given XPath |
| startsWith(“”) | String | Tests if this string starts with the specified prefix. |
| endsWith(“”) | String | Tests if this string ends with the specified suffix. |
| contains(“”) | String | Returns true if this string contains the specified String value. |
| length() | String | Returns the length of this string. |
| collectionSize() | All types | Returns the size of current parameter’s collection. |
| instanceIndex() | All types | Returns the index of current instance of parameter |
Supported Operators
| Type | Operators |
| unary | ! |
| multiplicative | * / % |
| additive | + – |
| relational | < > <= >= |
| equality | == != |
| logical AND | && and (case insensitive) |
| logical OR | || or (case insensitive) |
Examples listed below will help better understand the functionality of the Conditional module.
4.7.1 File conditions example
This example will help understand how to set up a conditional module that chooses the execution path based on weather a file exists at a specific module output.
To create this conditional module follow the steps below,
1. Right click on the empty area in any workflow and select “New->Conditional”
2. Click on “Conditions” tab and click on “Edit” button.
3. Click on “Add” button to create a new parameter. Name the parameter, for example as “inputFile”. Choose the file type if needed and click “OK”.
4. Click on the “Condition source code” area and press the F1 Key to see a list of available parameters (NOTE: If there are no parameters declared, then there will be no parameters displayed when F1 key is pressed. New parameters have to be defined for the current conditional module before the conditional source code is specified). Choose the “inputFile” parameter by double clicking on this option.
5.Enter a “.” after the inputFile (inputFile.) to access the various functions. Choose”exists()”under “File functions” option by double clicking on it (inputFile.exists()). This condition checks if the parameter “inputFile” exists.
6. Click OK and a new conditional module is created with one input and two outputs, “TRUE” and “FALSE”. If the parameter “inputFile” exists then the conditional will feed the inputFile to the “TRUE” output Parameter else to the “FALSE” output parameter.
7. Other functional modules can be connected to the outputs of TRUE/FALSE accordingly. If one output is always used, the other output could be disabled like any other module output.
4.7.2 Arithmetical/Comparison example
This example will demonstrate how to check the value of a parameter and determine if it has positive value(this number could be output of a previous module or information in the meta data).


 1) Follow the previous example until the step where the parameters are defined. Click on edit and create 2 input parameters, number1, number2 and both are of type “Number”. Click “OK”.
2) In the “Condition source code” area type the following “Number1 > 0 && Number2 > 0”. This condition will check if both the inputs, Number1 and Number2 are greater than zero i.e. positive values. The conditional module created thus will have two inputs (Number1 and Number2) and four outputs (2 True and 2 False).
3) Arithmetic comparisons with other types of parameters (String, File, Numbers etc ) can also be performed using the Conditional Module. For example, a conditional module can have 5 input parameters like,
inputFile – Type: File
inputDir – Type: File
Number1 – Type: Number
Number2 – Type: Number
Name – Type: String
We can make various conditions like,
a) inputFile.exists && inputDir.isdir() :This condition checks if inputFile exists AND inputDir is a directory. This will return TRUE only if both the conditions are true since && logical operator is used.
b) inputFile.exists() || (Number1 + Number2 > 10 && Number1 * Number2 < 500): This condition checks if inputFile exists OR Number1 plus Number2 is greater than 10 AND Number1 times Number2 is lower than 500. This condition will return true if inputFiles exists OR if both arithmetical conditions are True.
4.7.3 Metadata conditions example
Another important and useful feature of Conditional Module is its ability to be used with a Study module. Metadata information from the input files can be used to create various conditions, for example “inputFile.belongsToGroup(“Young”)”, where Young is a group created under the Study Module. This condition will ensure that all the input files that belong to group Young will be fed to the TRUE output parameter. For more details on setting up groups in a study module using metadata information please refer to the Study module description.


4.8 Web service modules
The type of this module already implies its role in the workflow, it allows users to call web services and use its results for further processing. As of version 5.3 only SOAP (Simple Object Access Protocol) based web services are supported. Web services are described in a special XML file, WSDL files, which have different versions and 5.3 only support WSDL 1.1.
In order to create a web service module, please follow these instructions:
1) Right click on the canvas and select New->Web Service…

2) In a newly opened dialog, enter a valid WSDL location URL and click Connect.

3) Pipeline will try to connect to WSDL document and show all interfaces and methods of selected web service.


4) After selecting the interface and method, click on “Create module” button. A new web service module will appear on the canvas with all the inputs that selected method requires. Below are two examples of different methods from the same WSDL document.
The following image shows a web service module which doesn’t have any input parameter,

but the following image has 3 required input parameters and pipeline automatically defined them. Pipeline will try to detect parameter types and set them. Names of input parameters are set automatically and are not subject to change.

Let’s right click on the module and see what’s inside. The web service module has similar metadata values as other pipeline modules in their Info tabs. Parameters tab shows all input parameters as well as output paramaters. Inputs are the same as for other modules, but outputs are different. Before talking about Outputs, please note that you have couple limitations when playing with parameters of web service modules. Unlike other modules, these modules won’t allow you to change input parameter names or create new input parameters. You will only be able to create new outputs.
1) Click on Add button and a new parameter will be created, which by default is already an output parameter.The image below shows the described scenario which was done with “list_databases” method. Thus, it doesn’t have any input parameter and only has the newly created output parameter “New Parameter 1”.

2) If the newly created parameter is not selected, select it and “Select output branch…” tree will appear. This tree shows you the hierarchy of the output XML the web service provides. The Output of SOAP web service is expected to be an XML document. If you don’t select anything from the tree, then the whole result in XML format will become the return value of the selected output parameter. But if you don’t want to deal with XML documents and are only interested in getting text output from the web service, simply select the youngest child in the tree (node which doesn’t have children).

In this example, we need to take just definitions of web service’s output, so when we connect other modules to this string output parameter, we won’t have to worry about parsing XML. Of course, we could select any of the parent of “definition” node ( for example, we could select Definition, or ArrayOfDefinition, or even Root ) but in that case the return value would be in XML and the next module would need to parse it.
3) Click OK and you’ll notice the output parameter which we just created.

Now we can test our web service, simply click the Play button ( or Ctrl+R on Windows, Cmd+R on Mac ) and the web service module should complete in couple seconds. After completion, right click on the module and select “Show Results”.

A similar to Execution logs dialog will open which will provide basic information of the web service and its output.
Switch to “Output Stream” tab, there you can see the output of web service module execution.

It is a SOAP Envelope and includes namespace information for parsing the result. You may now wonder and ask such question “But didn’t we choose to have just the “definition” tag as output ?”, well please note, that when we chose that, we were configuring a single output parameter of this module and this is the output stream of the web service module which contains the whole output. It will always stay the same, no matter if the module has any output parameter or multiple of them.
In order to use the return value of configured parameter, simply connect the output to other modules.

As you can see, we got 53 results and the next module, started to execute all of them.
Finally, if you created a web service module and in the future you want to change the method or interface, you can do it by switching into tab “Service Details” in Edit Web Service dialog.

There you can check and select all interfaces and methods of the web service as well as get information about method parameters. Please note that as soon as you change the interface or method, all previously created output parameters will be removed.
4.9 Transformer Module
Transformer modules are a new type of module introduced in Pipeline version 6.1. These modules expand on the functionality of the current transformations feature that exists in the module definition window of regular modules. Allowing users to do transformations in an independent module opens up many avenues for manipulating parameters in new ways as well as simplifying workflows. Transformers follow much the same format as regular modules. You can create input parameters to hold dynamic values, such as file names, and then create transformation steps to transform the values in different ways. The steps happen sequentially and their result is stored in a single output parameter that is automatically created by the module.
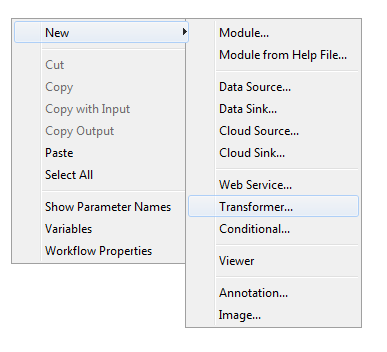
1. To get started using transformers, right click the empty canvas and click the new “transformer” module type.
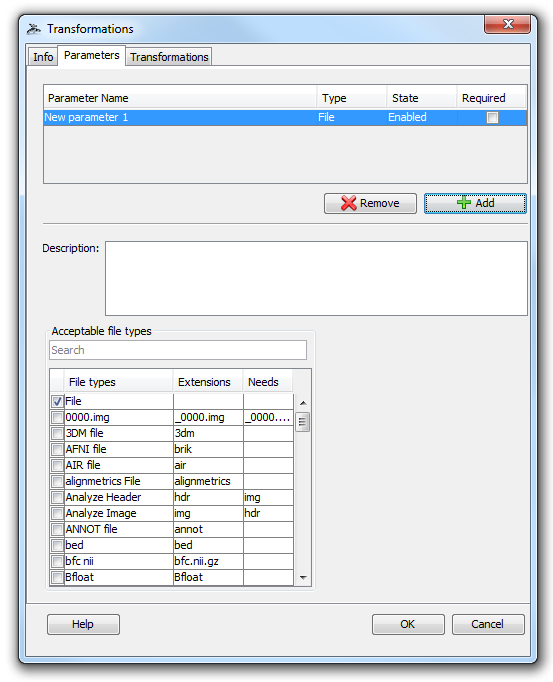
2. After creating the transformer, the module definition window opens where the users can specify any number of input parameters and then configure various transformations. As a simple example, let’s click the “Parameters” tab and add a new input parameter with the type “File”.
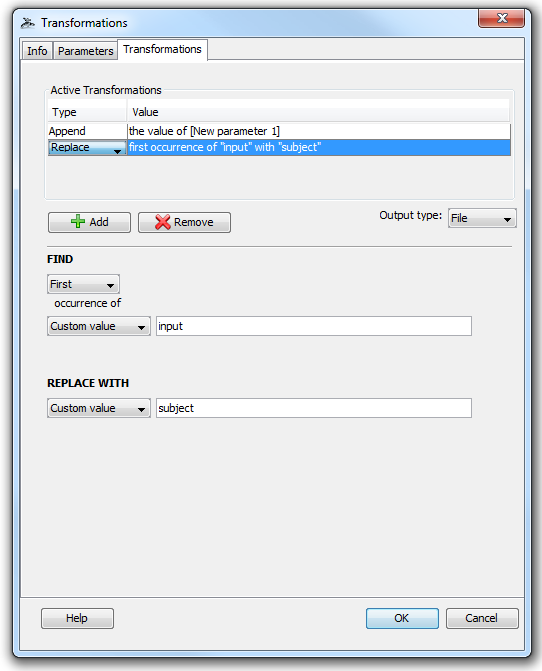
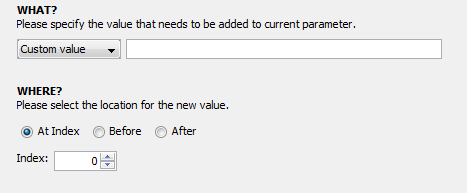
3. Click the “Transformations” tab so we can start transforming. The transformer module does not automatically include your input parameters in the resulting output unless it is told to do so. Thus, to begin transforming the input we must append it to the output of the transformer module which always begins empty. To do this, click “add”, select “append”, then change the dropdown menu from “Custom Value” to “Parameter Value”, and finally select the input parameter we created in the previous step.
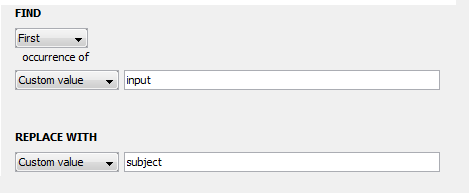
4. Now we can transform this input in any way we like. To continue our example, let’s say that we know the file(s) given to this input parameter will contain the word “input” and we want to change that to “subject”. We can “add” another step, select “replace”, and then type “input” in the first box and “subject” in the second box so that the the former will be replaced with the latter. We can also select a type for our output parameter, which will be automatically created when we finish making the module. In this example, our input is a file and we want to keep the output as a file so change the dropdown menu next to “Output Type:” to file. Our transformer window should now look like this:
5. Click “OK” at the bottom of the window to finalize our module. It will look like a smaller version of a regular module:

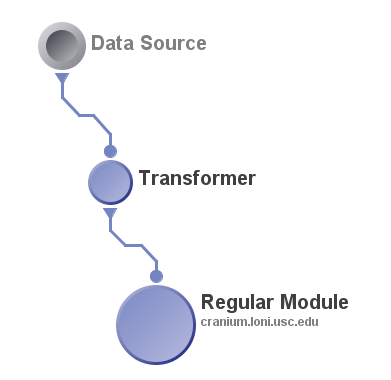
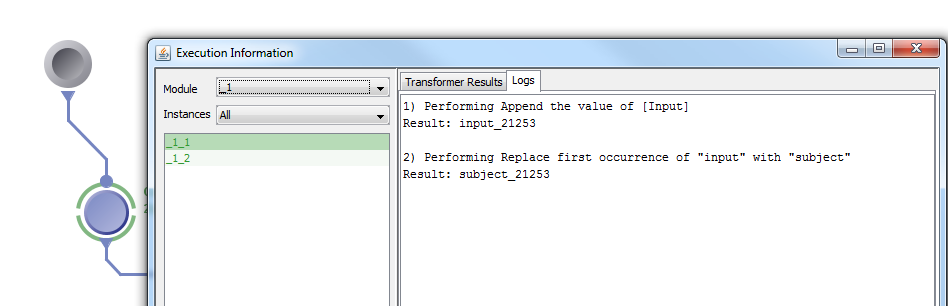
6. To complete the example, we can add a data source of input files to connect to the transformer module’s input parameter, as well as an executable module to connect to the transformer’s output parameter. It is important to note that transformer module’s cannot execute on their own and must be connected to an executable module. After executing, the evaluation logs of the transformer module can be checked by right clicking the transformer and it displays each step and the corresponding result.
The example above was very simple, but you can create a variety of complex transformations using the 4 available transformation types:


Currently, transformer modules are not meant to replace the old transformation feature and there is some overlap in the functionality of these 2 features. The old transformations feature excels at manipulating output parameters and setting up definitions for optional parameters.
4.10 Remote file browser


Now with Remote File Browser you will be able to browse remotely the files located on the server and select them as executable locations, parameter values, and data sources and sinks. This feature appears when you check the “Remote” checkbox and click on the “Remote browse…” button or for some cases like data sources simply by clicking Add button and selecting Remote file.
4.11 Processing multiple inputs
One of the strengths of the LONI Pipeline is its ability to simplify processing of multiple pieces of data, by using the same workflow you use to process a single input. The only change you need to create a data source to hold the multiple inputs. The data source can then be used as the input to any module in the workflow.
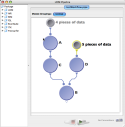
You can even provide multiple inputs to multiple parameters. For example, if you have a parameter on a module with a data source feeding in 4 inputs and another parameter also with a data source feeding in 4 inputs the Pipeline will submit 4 instances of that module for execution with each pair of inputs being submitted together. If you were to bind 4 inputs to a data source, and 5 inputs to another, the Pipeline would submit 20 instances of this module for execution. The commands will be composed of the dot product of all the inputs provided. For the latter case, the order of iteration depends on the order of the parameters. In other words, if the 4 inputs (say: A, B, C, and D) are provided to the module’s first parameter and the 5 inputs (say: 1, 2, 3, 4, and 5) to its second parameter, the Pipeline would generate command arguments in the following order:
Alternately, you can use a .list file (a file ending with a .list extension which contains the path to all input files) to specify multiple input files.
Note that the cardinality of modules will be matched up whenever possible in the workflow, and whenever there is a mismatch, the inputs will be multiplied. Here is an example to illustrate.
 |
In this workflow the Pipeline will execute 4 instances of every module. |
 |
In this workflow modules A and C will have 4 instances. Module D will have 5 instances and module B will have 20 instances. |
Also, it is worth mentioning that it is valid to connect two output parameters to the same input parameter. Let’s look at the example below:

Let’s say that module A creates an output file called A_OUTPUT and module B creates an output called B_OUTPUT. Module C describes the GNU copy command, and has two input parameters – Source and Target, both taking one argument. The output parameters of module A and B are connected to module C’s Source input parameter. Finally, let module C’s Target parameter be bound to some target path, “/nethome/users/someuser/”.
The resulting execution is as follows – module A and B will run and create their respective output files, and module C will then execute two commands:
- cp A_OUTPUT /nethome/users/someuser/
- cp B_OUTPUT /nethome/users/someuser/
If the location you’re running this workflow at has a cluster, the pipeline will run both commands concurrently; if a cluster is not available, both commands will run in series and wait for completion before moving on to any subsequent modules.
4.12 Enable/Disable parameters


Most modules have 2-3 required parameters on them, and several more optional parameters. If you want to exercise any of those additional options, simply double-click on the module and you’ll see a list of all the required and optional parameters for that module. For each additional option you want to use just click on the box on the left side of its name to enable, disable and export it. When the checkbox is not checked, parameter is disabled and Pipeline will not require to input value for that parameter. If checkbox is checked, parameter is Enabled and Pipeline will require to input value for that parameter. Finally when checkbox is checked and has double line, it means that current parameter is exported. Notice that you are not able to disable parameters that are required.
4.13 Annotations
 As your workflow becomes larger and larger at times you may forget what a particular section of it was meant to perform. To help jog your memory, you can add annotations to your workflow to remind you what you were doing later on, or as notes for other people who use your workflow. The Pipeline currently supports textual and graphic annotations. To add an annotation, right-click on an empty area of the canvas and select either ‘Add Annotation’ or ‘Add Image.’ A dialog will pop up and, based on type of annotation you are creating, you will be able to enter text or select an image. Click OK when finished and you should see a translucent box appear in your workflow where you clicked. You can move the annotation around by just clicking and dragging. You can also copy and paste annotations just like other modules. Lengthy text annotations can be collapsed to reduce clutter in a workflow, then expanded to retrieve full descriptions. A ‘Hide Annotations’ option in the workflow toolbar can be utilized to completely hide all annotations from the canvas.
4.14 Variables
 To make things easier when entering values for module parameters, you can define variables to represent a path name that can then be used as the input or output to a module parameter. You can access the variables window by going to Window -> Variables. Click on the Add button, then type in the Name (whatever you want to call the variable) and the Value (the path associated with the variable). The Scope column shows the module group name where this variable is created. Variables are inherited from parent module group to child module group, but variables defined inside child module group cannot be seen by its parent. If you want to continue adding more variables, click on the Add button again; otherwise, simply close the Variables dialog box. Now, in order to use a variable in your workflow, you use the convention {variableName} as the value for your input and output parameters (i.e. surround the variable name with curly braces). The Pipeline will parse the actual path location of the variable for you when it executes.
Pipeline supports two special variables – {$username} and {$tempdir}. {$username} is predefined for all workflows and its value is the username of the user that runs the workflow. {$tempdir} requires configuration by the Pipeline server administrator either via the Pipeline server installation utility or the server terminal GUI. Once configured, its value will be the path to a globally-accessible scratch directory. You can use both in the same way that you use other variables.
4.15 IDA
 The Pipeline has the capability to utilize data from the LONI Image Data Archive (IDA). Pipeline takes advantage of our cluster nodes to download files in parallel from the IDA database. This improves download time drastically, and you don’t have to keep connected to the server during the download. You can also enable metadata so that metadata files will be downloaded along with data as a Study design module.
In order to establish a connection to the database, go to Tools > Database. Under IDA tab, enter The Pipeline has the capability to utilize data from the LONI Image Data Archive (IDA). Give your IDA username and password and click Connect. You will see on the right hand side the data that you have access to (you will have to either upload your own data through the IDA web interface at https://ida.loni.usc.edu/login.jsp, or log into IDA and put existing files into your account).
Select the files that you want to process with the Pipeline, desired file format and where do you want to put the data. You can put data remotely on the server, or locally on your machine. If destination is remote, check the Remote box and specify server name. If you want to include metadata, check Include metadata check box, and select metadata file destination server. Click on Create Module, after a while a new workflow will be created with an IDAGet module and a data source (if include metadata was not selected) or a study (if include metadata was checked).


 At this point data files are not downloaded. (Metadata files are downloaded, if you have it enabled.) You will notice the output of the IDAGet module has the file type you specified. You can now connect this output to the input of your workflow and run the workflow. As the first module of the workflow, data will be downloaded from IDA and fed directly to the next module. Notice the data and metadata downloaded from the IDA will be temporary stored as intermediate files of the workflow, they will be deleted if you reset the workflow.

 If you like to use data from IDA over and over again, it is better to download the data the first time to some permanent location and reuse it later. You can do so by creating a data sink and connect it to the output of the IDAGet module. You can either list output items one by one, or use directory dump. After successfully running this workflow, you can copy this data sink and paste it to any workflow, right click on it and choose “Convert to study”. The data sink will be automatically converted to a study module with proper inputs. Later if you want to reuse this data set, you can simply copy this study module to your workflow.
4.16 NDAR


 The Pipeline supports integration from the National Database for Autism Research (NDAR) database. First of all, you need to link your NDAR credential in LONI Pipeline. Login with your NDAR credential under Tools > Database & Cloud Storage. Once it’s connected, give package ID(s) (see below for more info) you would like to download, then select file type and the Pipeline server address. When you click Create Modules, a workflow will be created with specified package ID and file type. You can connect your processing workflow to the output parameter and run the workflow.
Please note, the majority of NDAR packages are very large in size (over 1GB is common), so downloading a package may take a long time. Once the download is complete, it will list all data files (dicom, nifti, minc, analyze img) in the package as inputs.

 Package ID: When you create a new package, you can find out the package ID after you specify the package name on NDAR website. To find out package IDs of existing packages, open Download Manager to find out the IDs.
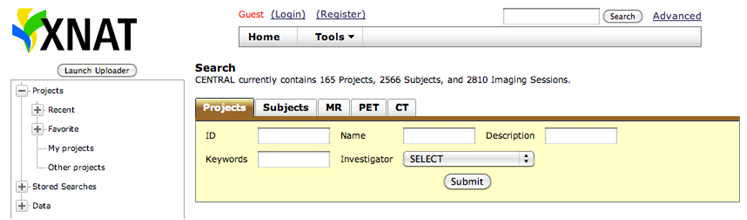
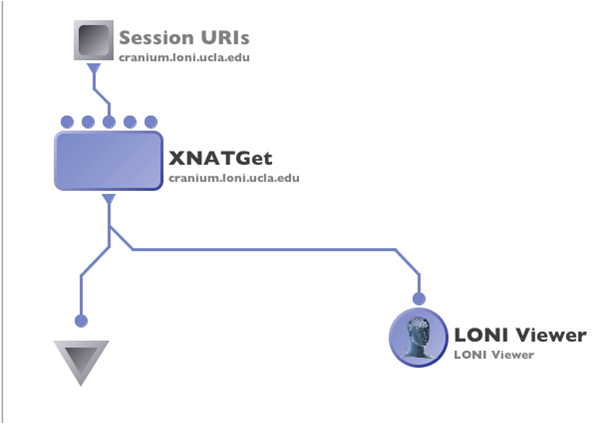
4.17 XNAT
 The Pipeline supports integration from the XNAT database. By providing the XNAT Catalog file (which is an XML file identifying your data, it can be downloaded from XNAT web interface), Pipeline takes advantage of server’s cluster nodes to download files in parallel from the XNAT server, and to do file conversion if necessary. The mechanism is similar to the IDA downloading, which provides tight integration on your processing steps, improves download time drastically, and you don’t have to keep connected during the download. You can also enable metadata so that metadata files will be downloaded along with data as a Study design module.
Pipeline-XNAT interface requires XNAT Catalog XML file from an XNAT server. Catalog file is an XML file that contains a list of sessions/entries, each entry is represented as a unique URI on the XNAT server. Catalog files can be easily obtained on XNAT’s web interface. For more information, please check our detailed step-by-step protocol for anonymizing, uploading, downloading and utilizing data from XNAT database.
Anonymize Subject data
Open Pipeline Client and type anonymize at the search window. Choose the module. Connect a data source with all the dicom directories that needs to be anonymized and save it the required location. Run the workflow to anonymize the dicom files. One could also change the .das file that is used here as the default and based on the user requirement a new new .das file can be generated.
Uploading files to XNAT central
Go to XNAT server and login if you have a username if not click on register to create one.
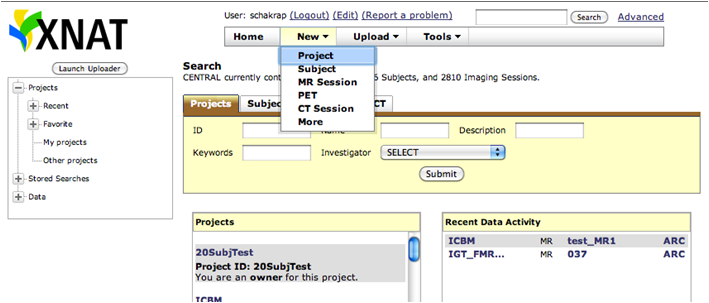

Once you login, click on New and choose Project.
Enter the information on the project form and also choose the accessibility option and submit.
Also you could create new subjects under the project, by clicking on new Subject and filling out the information that is required.
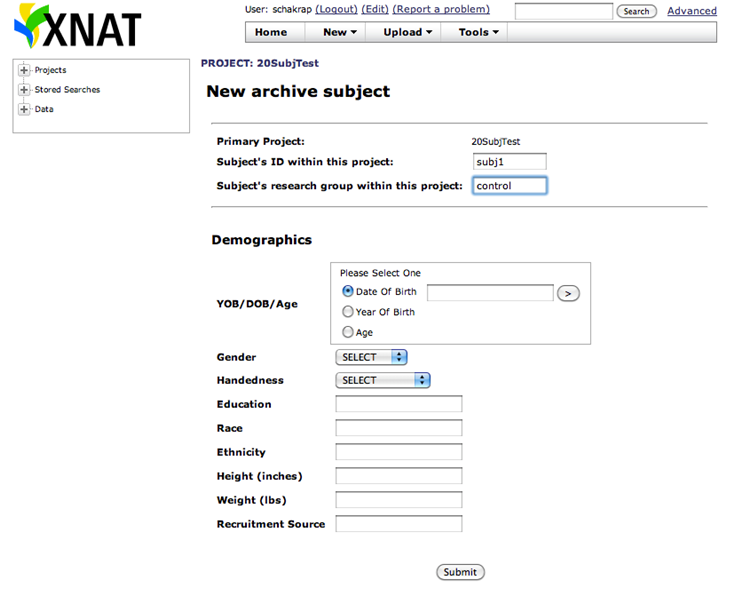
To upload images, click on Upload and choose Images,


Choose Option1: Choose the project to which you want to upload the data. Select the .zip file and upload the images.
Once the uploading is done, follow the instructions to review and archive the uploaded data.
Now go to Pre archived images and submit the sessions so it is achived in the specific project. For eg, Under Upload option choose “ Go to pre-archive” section.
Here on this page you will see a list of all the images that are uploaded.
Click on each session and select the Project, Subject and session option and click on submit to archive the sessions.
Once the subject/sessions are submitted, you can view them under the main Project page.
Downloading archived files using Pipeline
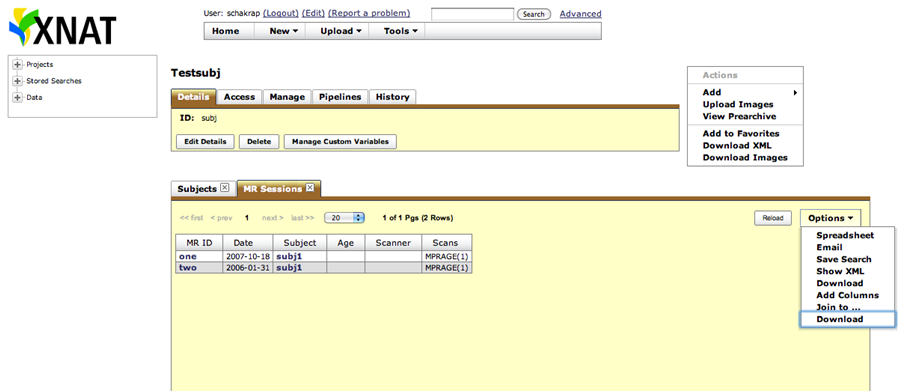


Choose the Project that you are interested in. Go to MR sessions. Click on Options and select Download.
This will open another window as shown below. Choose sessions and data type, and select Option 2 (XML) as download format.
Click on submit and an XML file opens.
Right click on this file and save it to you local computer.
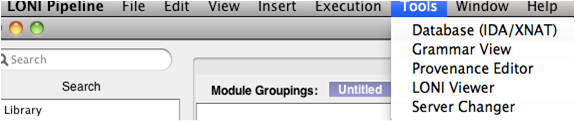
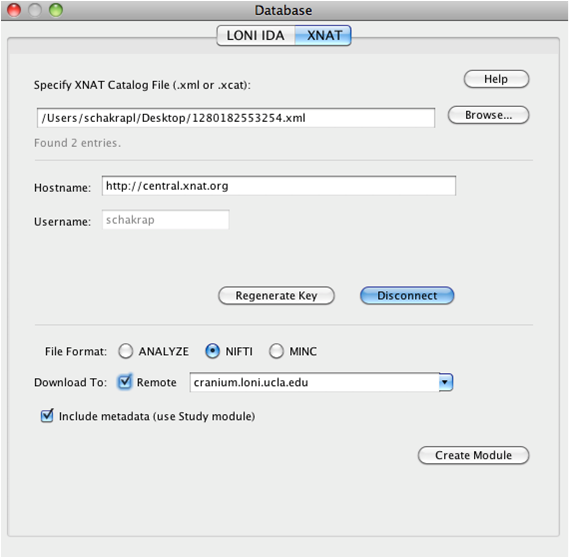
Open the Pipeline client (PL 5.1). Go to Tools and select Database (IDA/XNAT).
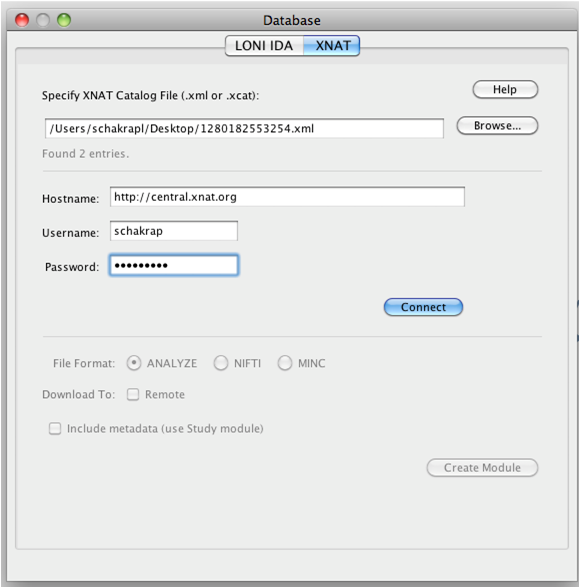
Under XNAT tab, browse and select the xml file that was downloaded from the XNAT central website. Fill in the username and password information and connect.
Also one could download the data in different formats. Choose one. The data can also be saved on a remote server or on the local machine.
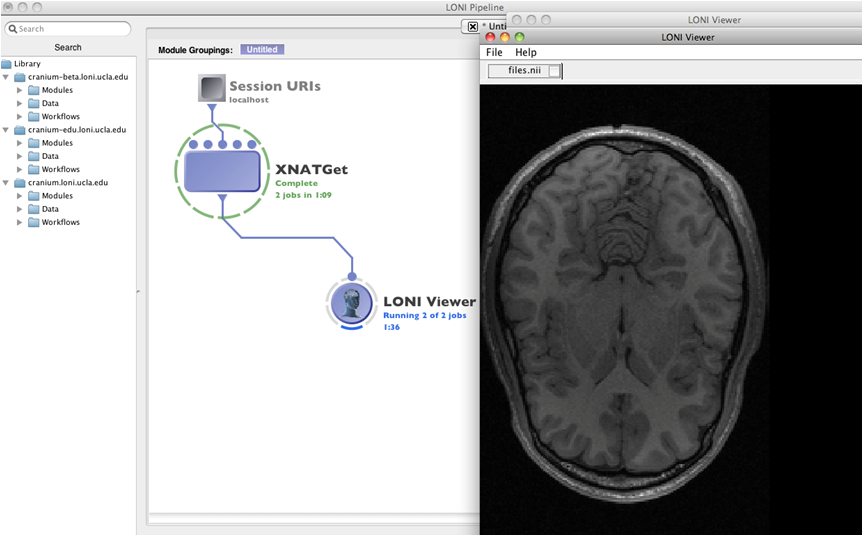
Click on Create Module and connect a LONI viewer to view the data that is being downloaded, or module with appropriate input to process the data, or a data sink with specified download file location path to save the data.
Run the workflow, XNATGet module will download the data.
4.18 Cloud storage


You can specify your data in the cloud as input and output to any Pipeline workflows. Currently supported cloud storage vendors are Amazon S3, Box and Dropbox. To start, link your cloud account to the LONI Pipeline under Tools > Database & Cloud Storage > Cloud Storage tab.
To link your Amazon S3 account, you need to specify Access Key ID and Access Key, which can be found here (after login, it’s under Access Credentials). Copy and paste the Access Key ID and Access Key and click “Link Amazon S3”, the status under Amazon S3 should show “Linked”.
To link your Box account, click on “Link Box…” button and click on “Open Link Page” button. Your browser will open a web page and you need to login with your Box account. After successfully authenticate, you can close the web page and go back to LONI Pipeline and click “Done” button. Now the status under Box should show “Linked”.
To link your Dropbox account, click on “Link Dropbox…” button and click on “Open Link Page” button. Your browser will open a web page and you need to login with your Dropbox account. After successfully authenticate, and click “Allow” button, you can close the web page and go back to LONI Pipeline and click “Done” button. Now the status under Dropbox should show “Linked”.
You can now use your data in the cloud as input and have results saved to the cloud by using the Cloud Source and Cloud Sink modules.
4.19 Server changer
 Suppose you have more than one Pipeline servers running, each of them is configured so that all executables have the same path. In this situation, you want to change the server address on some or all the modules in a workflow quickly, the server changer tool lets you do this. Select Tools -> Server Changer, specify particular regular modules, data modules, or all of them, and choose the new server and click “Change”. Note the new server must be already stored in Connection Manager.
| Previous: 3. Interface Overview | Table of Contents | Next: 5. Execution |