
- Module definition
- Alternative methods
- Module groups
6.1 Module definition
In order to create or edit module, you need to know how a module is defined. We will go over module definition below. You can create a module this way (there are other ways described below), or edit any attribute in a module.
6.1.1 Info tab

When creating a module, whether it’s a simple module or a module group, you will always encounter this tab for adding information about a module. While none of it is required, it helps to have the information.
6.1.1.1 General module information
- Module Authors is a list of all the authors who contributed in describing the executable’s Pipeline definition.
- Executable Authors is a list of all the programmers who contributed to writing the executable code.
- Package is the name of the suite that the executable is a part of. For example, Align Linear is a part of the AIR package, Mincblur is a part of the MNI package, etc.
- Version can refer to the package version or the individual executable version depending on how the developer manages their versioning. Use your best judgement to decide what would help users of your module definition more.
- Name is the human readable name of the executable that you’re describing.
- Description should describe what the program does and any pertinent information that might help a user who wants to use the module.
- Icon In the top right corner of the tab is a large square button. Click on it to select an image for use as the icon of this module. You don’t have to worry about adjusting the size of the image to any special dimension (the Pipeline will take care of that for you). After you have selected an icon, there is a remove button that lets you remove the icon. You can also copy, paste, and remove the icon by right-clicking the module in the workflow and choose the appropriate action.
6.1.1.2 Citation information
When creating a module definition, it’s a good idea to enter citations of the papers/presentations/etc. that we’re used to develop the module. When this information has been entered, users can easily be linked to the citation material through the use of Digital Object Identifiers (DOI) or PubMed IDs.
To add a citation to the module, click on the ‘Edit’ button next to the citations pane. A new dialog will appear, and you can click the ‘Add’ button and type in a citation in the new text box that appears below. If you want linkable DOIs or PubMed IDs just make sure to type them in the format defined in the window, and the Pipeline will take care of the rest. An example citation could look like:
Linus Torvalds, Bruce Schneier, Richard Stallman. Really cool research topic.
In Journal of High Regard, vol. 2, issue 3, pages 100-105.
University of Southern California, April 2007. 10.1038/30974xj298 PMID: 3097817
You can even enter your citation information in bibtex format. When you’ve entered them all, click OK and you will see links to the DOIs and PMIDs that you’ve written into the citations.
6.1.2 Parameters tab

The parameters tab contains information describing the command line syntax of the executable you’re describing. As a learning aid, we can use a fictional program called foo with a command line syntax of:
foo [-abcd -e arg -farg1 arg2 arg3] file1 [file2 ...] -o outputFileArg
You’ll notice our program has several optional parameters at the beginning with only two required parameters towards the end. Now let’s go about describing this in the Pipeline.
6.1.2.1 General parameter information
If we look back at our fictional program command line syntax, we see it has 8 total parameters. Let’s start by adding the first 4 which are:
-a-b-c-d
All four are optional and don’t require any additional arguments to them, so go ahead and click the ‘Add’ button 4 times to add 4 new parameters. Now for each parameter, edit the name to something meaningful. Notice on the right to the parameter name, there are two check boxes, Required and Input. Checking Required means this parameter is required by the executable. Checking Input means this parameter is input, otherwise it is an output. Leave Required unchecked and Input checked. In the bottom half of the window change the ‘Arguments’ selector box to ‘0’, which tells the Pipeline that these parameters don’t take any arguments from the user. Additionally, for each parameter, fill in the ‘Switch’ field in the lower part of the dialog to the appropriate value (-a or -b or -c or -d). At this point you may want to fill in a description for each parameter, so users will know what they do when they are turned on.
Because these parameters don’t take any arguments we don’t need to set the ‘Type.’ So far your screen should look something like the following figure:

Now that we’ve added the first four, let’s work on the next two parameters: -e and -f. Click ‘Add’ once for each parameter, and the Pipeline will add 2 more new parameters for you. Notice the order that you define the parameters, because that order is what the Pipeline will use to construct the command that gets issued to the system when it’s executing workflows. In case any of your parameters are out of order, just click and drag them each into the order that you want.
Again, both of these parameters are optional so there’s no need to check the ‘Required’ box in the parameter table. However, each of these are ‘String’ type parameters, so change the type from the default ‘File’ to ‘String.’ Also, notice that the -e takes in 1 argument and the -f takes in 3 arguments. Adjust each accordingly like you did with the previous parameters. Finally, enter the switch for each and give a helpful description of what each one does, so the end user can figure out how to work with the module.
There’s something peculiar about the -f parameter and that’s that it does not have a space separating it from its arguments on the command line. To tell the Pipeline about this in the module definition, uncheck the checkbox labeled ‘Space after switch.’


Let’s add the next parameter, so click ‘Add’ to place another parameter into the defintion. Another thing to notice about this parameter is that it takes 1 or more files, so we should set the ‘Arguments’ selector box to ‘Unknown’. Also, because this parameter takes files as its arguments, we leave the ‘Type’ set to the default, however we can tell the Pipeline a little more about this parameter by selecting the specific type of file that the program expects, so let’s select ‘Text file.’ This will help the Pipeline in checking for valid connections between different modules, or helping users in selecting files from their computer to be bound to this parameter when using the module. If the file type needed for a parameter that you’re defining is not listed, you can just leave it set to ‘File,’ which will accept any type of File.
Go ahead and add the last parameter (-o outputArgFile) to the definition. Because this is an output parameter, make sure to uncheck the input checkbox in the parameter table next to this parameter. Your definition should look something like shown on left.
6.1.2.2 Parameter types
When you come across programs that need other types of parameters, refer to this list for information about each type supported by the Pipeline:
- Directory
- Choose this type for inputs when a program expects the path to an _already existing_ directory.
Choose it as an output parameter if the program expects it as a path to write data out to. Please note that the Pipeline will not create output directories for programs. It will specify a path for a directory to be created at when generating commands, but the actualy directory creation is left up to the program. - Enumerated
- This should be used for input parameters that accept an option that can be only from a limited set. For example, a program might one of the following: “xx”, “yy”, “zz”.
- File
- The most common type of parameter, but can be further categorized by choosing a file type defined in the Pipeline. (NOTE: Choosing file types allows the pipeline to establish connections between complementary parameters, and appends appropriate extension to intermediate files being created between modules, which some programs rely on.)
- Number
- Either a integers or floats
- String
- Any string of characters required by parameters
- Flow Control
- This type of parameter allows module to be started without transferring any data from parents. For example if you have two modules and they don’t share any parameter between them but you want one module to start after another, then you can connect them by using this type of parameter.
6.1.2.3 File types


If you have a module that has an input parameter of type File, you must specify at least one file type for the parameter. It can be the generic File, or a specific type of file. Pipeline has a set of predefined common file types. They are listed with name, extension and optionally need file type. The name describes the file type, the extension defines the extension of the file, and need file type tells whether it requires some additional file (e.g. Analyze image has an extension of img and need file hdr). You can type your keyword to search for a specific file type. If you don’t find the file type, you can also define your own file types.
If you need to define a new file type, click “Edit file types…” on Paremeters tab, and click on the + button. Enter in the Name, a description of the file type, the extension, and also any need file(s) that have to be associated with this file type. Click OK, and the newly defined file type will be added as one of the options in the Acceptable file types window. Please note: the Pipeline determines filetype compatibility between connected parameters solely by checking for matching file extensions. The name and description of filetypes is not compared during compatibility tests.
6.1.2.4 Parameter arguments size
Every parameter in the Pipeline needs to be assigned a number of arguments that it needs to accept. Except for enumerated types which are set to 1 automatically, for all other types, e.g. Directory, File, String, and Number, there are three cases for specifying arguments size.
In most cases this is simply some constant number (1,2,3,4,5,6,…). Simply check “Specified” button and specify the number of arguments next to it.
Sometimes for an input parameter could take any number (infinite number) of arguments. Simply check “Unknown” button.
Sometimes for an output parameter the size could depend on an input parameter. Simply check “Based on” button and in the drop down, specify which input parameter it depends on. Then when the module is executed in a workflow, the base parameter will have a number of arguments equal to the base parameter, which should have its arguments size set to ‘Unknown’ for any practical purposes. Let’s demonstrate this with an example.

Suppose you have a program that can take in an (theoretically) infinite number of inputs on the command line, and will process each of those inputs and create a corresponding output. Our command line syntax would look like the following:
./foo -inputs in1 in2 in3 in4... inn -outputs out1 out2 out3 out4... outn
So if we have 2 input files, we’ll have 2 output files; and if we have 25 input files, we’ll have 25 output files. To describe this in the Pipeline, make a new module with two parameters; one input and one output. Make the arguments size of the input ‘Unknown’ and the arguments size of the output “Based on” the name of the input parameter. Your module should then look something like shown here.
6.1.2.5 Advanced parameter information

While describing executables for use in the Pipeline, you will inevitably come across the need to use some of the advanced parameter features in the Pipeline. Right-click a simple module and select ‘Edit Module’ to bring up the editing dialog for the module. Click on the Parameters tab, select a parameter you want to edit, and then click on the ‘Advanced…’ button at the bottom right of the dialog.
6.1.2.5.1 Select dependencies
On the left side of the advanced parameter dialog, you’ll find a list of all the parameters in the module, except for the parameter that you’re currently editing. By checking a box for each dependency, you’re telling the Pipeline that if a user enables the current parameter (the one you’re editing), then you must also enable the following parameters (the ones you check in the advanced parameter dialog).
6.1.2.5.2 Transformations
Sometimes an executable will take in an output and will automatically create an output that is just some variation of the input. Let’s use an example:
./foo infile
Let’s assume the program creates the output to be the same name as the input but with a .out appended to it. To handle this, create an output parameter in the ‘Parameters tab’ and then click on the ‘Advanced…’ button of the output parameter. In the ‘Transformations’ area of the parameter set the base to the name of the input parameter. Then select the ‘Append’ transformation operation from the selection box and type in .out for the value. Click ‘Add’ and you’re done! You’ve just created a side effect output. Note that as a result of specifying a base parameter in this dialog, the default behavior of the Pipeline is to exclude the parameter from the command line. If you want to change this behavior, check the ‘Include transformed parameter on command line’ box. It will simply use the transformed name as the location of the output and pass that on to successive modules for usage. Here are descriptions about how the other transformations work:
- Append
- Add a string or regular expression to the end of the filename. Example: append:xxx
/tmp/myfile.img becomes /tmp/myfile.imgxxx - Prepend
- Add a suffix string or regular expression to the filename. Example: prepend:xxx
/tmp/myfile.img becomes /tmp/xxxmyfile.img - Replace
- Replaces every occurrence of the find value with the replace value.
Example: find:my replace:your
/tmp/myfile.img becomes /tmp/yourfile.img - Subtract
- Remove the string or regular expression from the end of a file. If the string is not found at the end of the file, nothing will happen.
Example: Subtract .img /tmp/myfile.img becomes /tmp/myfile
Example: Subtract .hdr /tmp/myfile.img stays as /tmp/myfile.img
Note that the transformation operations are only applied to the filename of the base parameter, not the entire path. Also, if you don’t specify a base parameter, then the Pipelie will put this parameter on the command line, and will apply the transformations to the path string that gets passed on to the next module. If the parameter is an input, the transformations are applied to the incoming path string and then put on the command line. The transformations never change the actual filename, just the way references to them are made on the command line.
6.1.2.5.3 Output/Error stream extraction


 You can extract module’s output and/or error steams as an output parameter of the module. To do so, create an output parameter and specify type String or Number. Under General tab of the parameter, you will see Data Extraction section. There are two ways to extract strings (keys) from output/error stream, String Matching, which matches the string before and after the key, and Exact Location, which extract the key at the row and column coordinates. Exact Location works well if the text is tabular formatted, and columns are separated by a common special character, such as comma (CSV), space.
Example (String Matching)
Suppose your program prints the following text in standard out (output stream):
Right-Caudate=245

Right-Putamen=473

Right-Pallidum=158

Right-Hippocampus=192
Suppose you are interested in the value of Right-Hippocampus, you can specify String Matching with Right-Hippocampus as Start string, and empty End string. After the job is completed, the server will parse the output stream and find matches (if any). In this particular example, 192 will be assigned as value of output parameter.
Example (Exact Location)
Suppose your program prints the following text in standard out (output stream):
Index,Data,projectIdentifier,subjectIdentifier,researchGroup,subjectSex,subjectAge,seriesIdentifier,modality,dateAcquired

41,119967-68523,ICBM,MNI_0665,Control,M,74.0,57216,MRI,2008-02-18

9,105206-68523,ICBM,MNI_1477,Control,M,61.0,49959,MRI,2008-02-25

22,18049-68523,ICBM,MNI_1086,Control,M,52.0,16194,MRI,2005-09-22
Suppose you are interested in subjectAge column, you can specify Exact Location, Comma as delimiter, All lines and Column number 7 (7th column). By default, it will find the first match of the indicated line and column (it will be 74.0 in the above example). However, if you want to get all matches, you can check Match all occurrences (it will have 3 values in the above example: 74.0, 61.0, 52.0).
In all cases, you can then connect this output parameter to another module’s input (it must have the same String/Number type) so that the value is passed onto that module.
6.1.2.5.4 Metadata extraction
The Metadata tab under parameter allows you to extract values from metadata and feed to the underline module. This feature is enabled for any modules with a Study module as ancestor.
All you have to do is to specify the XPath of the metadata element in which the value will be extracted, as well as where to put the value under on the command line. For example, we have a Study module with data and metadata pairs, one metadata looks like this:
<subject>

<id>12345</id>

<age>32</age>

<gender>F</gender>

</subject>
 And suppose we have a data processing module that takes the data file, and subject gender and subject age as input arguments. This can be done by creating input parameter for the data file, and under Metadata tab for the parameter, specify the XPaths for these elements, /subject/gender and /subject/age, or you can have them defined as workflow variables (gender and age), and use them as {gender} and {age}. You can specify the location, whether it’s in front of the data, (e.g.
 executable [gender] input) or after the data (e.g. executable input [gender]). Prefix allows you to give a prefix string for the extracted data, for example, your executable may require a prefix of -gender= before the gender value (e.g. executable input.img -gender=M ...).
Once you specify a data extract rule, click Add to add to the parameter. At the bottom of the panel there is a list of data extract elements. You can update or remove any by selecting the item in the list.
6.1.2.5.5 Output list file
Output list file is used when an executable generates unknown number of outputs, and the next module takes those outputs as if they were listed one by one.
Consider the following scenario, a program takes a zip file and only interested in .nii files in the zip file. The next module takes these nii files as input. To represent first program, we would create a module with output parameter type nii, and enable Output is a list file. Then we have to modify the program to write the paths of unzipped nii files to the list file, one path per line. The next module will be taking nii file as input just as normal. When executing, the command for the first module will look like /path/to/exec /path/input.zip /pipeline/temp/output.list, the actual .nii file paths will be in output.list file, and the next module will read the content of the list file and determine number of instances based on it.
6.1.3 Execution tab
 The Execution tab contains the module’s executable information, its path and server address, and advanced options such as maximum memory and stack size.
6.1.3.1 Executable location
The first thing you’ll want to do is specify the location of the executable. If this is a program on your local computer, just browse to the location of the program and select it.
If you’re setting up a server and you’re defining modules for use on it, then make sure you check the ‘Remote’ box, and type in the server address in the box, and that the path to the executable is the path of the executable on the computer the server is running on.
6.1.3.2 Advanced options

Some jobs may require some environmental variables to be set. In order to set an environmental variable, you’ll need to add them to environment variables table. The first column is the name of the variable and the second column is the value. Let’s say you want to define variable FSL_DIR with value /some/path. Put FSL_DIR in the first column and /some/path in the second column. Pipeline will run the module with these variables already defined.
If you need to run jobs with some specific grid variables, you’ll need to fill out the Grid Variables table the same way as for environmental variables ( see above this paragraph ). For example, if you are connected to server which uses SGE and would like to increase the memory limit of the job, then you could define following values
h_vmem 8G
or for stack size, you would need something like
h_stack 128m
With proper server configuration, the Pipeline can support MPI for Grid Engine and/or a special queue with external network access enabled. To enable this for your modules, check MPI and provide parameters for MPI programs, or check to enable external network access for programs that require external network access.
The last option in this tab is to always use outer product multiplication. This is relevant for modules connected to multiple data sources where the number of elements in each data source is the same but you want every element in the first data source is executed with every element in the second. Pipeline by default does inner product multiplication in this situation, but selecting this checkbox will change the behavior of the module to do outer product multiplication regardless of the number of elements in your data sources. See the example below.
If data source 1 contains 3 values [a,b,c] and data source 2 contains 3 elements [1,2,3], then…
*note that the values in the actual data sources will be on separate lines
Inner product multiplication will execute 3 jobs as follows:
a 1, b 2, and b 3
Outer product multiplication will execute 9 jobs as follows:
a 1, a 2, a 3
b 1, b 2, b 3
c 1, c 2, c 3
6.1.4 Metadata tab – Metadata Augmentation


The metadata tab allows you to specify instructions/actions to augment/modify metadata with values generated from the module. This feature is enabled for any modules with a Study module as ancestor. Pipeline automatically detects this condition, and will show one of the metadata file on the top part of the metadata tab.
There are three options you can do with metadata, append a new XML element, modify value for an existing element, and remove an element. All three options require you to identify the location of the element, using XPath. Alternatively, in the metadata sample tree provided on top of the tab, you can click on the element, the XPath will be automatically filled in.
In addition to the XPath location of the element, the Append option requires the new element name and value, the Modify option requires the element value. (Remove option only needs the location of the element to be removed).
 To specify element name or value, there are 4 ways. 1) Specified, in which specific, static value is given. 2) From input parameter, in which value are obtained from the specific input parameter. 3) From metadata, which extract element value from the metadata file. 4) Extract out/error stream, that element value is obtained from output/error stream of the executable.
There are two ways to extract strings (keys) from output/error stream, String Matching, which matches the string before and after the key. And Exact Location, which extract the key at the row and column coordinates. Exact Location works well if the text is tabular formatted, and columns are separated by a common special character, such as comma (CSV), space.
You can define multiple actions, which will be listed at the bottom of the tab.
Example:
You have a simple metadata with data as input, the metadata looks like this:
<subject>

<id>12345</id>

<age>32</age>

</subject>
It goes through a data processing module, which calculates some measure called MDS Score and print as output stream:
Start processing subject 12345...

Subject MDS Score: 32.25
Using Metadata Augmentation, Pipeline can gather value from output and put it to the metadata, so that result metadata will contain updated information corresponding to the result data, and also subsequent modules may make use of it (e.g. Conditional module, Data Extraction). For this example, we want to append subject’s MDS Score to its metadata.

 To do so, make a Study module with data metadata pair, and connect to the processing module. Under processing module’s metadata tab, the metadata XML should be automatically displayed as a tree format. Specify the action Append, specify the location in which the new element is appended, by clicking on the node of the XML tree. We want it to be a child under
 subject element, so we click subject node.
For the element name, we want to give a static name, MDS_Score. So we select Specified and give MDS_Score. For element value, we want it to be taken from output stream. We select Extract output/error stream option for Value, and click on the empty text field. A new window pops up, which lets you specify the String location. We check only output stream, and specify Use String matching rule, and specify start string as “Subject MDS Score: ” (without quotes). Leave end string blank, it will be the end of the line or end of the file. Check Case sensitive so that matching only happens when cases are also matched. Click OK to go back to Metadata tab. Finally, click Add to add this action to the list. Click OK to save to the module.
Now after the module is run, the result metadata (the XML can be viewed under module’s output files tab) will look like this:
<subject>

<id>12345</id>

<age>32</age>

<MDS_Score>32.25</MDS_Score>

</subject>
It is common for an application to generate a table of values as output. In order to extract the values from all cells and append them to the metadata file, we would have to define a specific rule for each cell. This can be time consuming. To expedite this, there is an automatic extraction feature that asks the user to define the characteristics of the output table and uses this information to append elements to the metadata file. First of all, Pipeline needs to know where to find the table. The options are the standard output stream, error stream, and any of the module’s file parameters. Next, the user specifies if there are column or row headers in the output table. If there are, then these header values serve as XML element names for the appended elements. If not, Pipeline generates generic element names (i.e., column_1, row_2, etc). The third criterion is the table delimiter. The user can either choose any whitespace as the delimiter or specify a delimiter by typing it in. Finally, the user needs to specify the organization of the derived data in the resulting metadata file. The options are “Columns as parents”, “Rows as parents”, and “Flat”. The first two are hierachical; in other words, an element is created with a name corresponding to a row or column header. Then, the values in the column or row are appended as child elements. The “Flat” option removes any hierarchy and combines the row and column header names to generate a flat XML structure with hybrid element names.
6.2 Alternative methods
In addition to the basic editing method, there are a few ways to automatically create modules.
6.2.1 From help file
You can use program’s help/manual text to create module. To do so, open a workflow and then right-click on any blank part of the canvas. In the popup menu, click New > Module… and you should be presented with a new window which asks for a help file or tab separated values.

In this window you can paste in a help file, a manual page, or a web-based documentation page and Pipeline will attempt semi-automatically to convert this textual description of the tool execution syntax to a module definition. As there is a considerable amount of variation between help/man/doc file formats, this conversion can be incomplete or inaccurate and must always be manually/visually inspected at the end.
IMPORTANT Please paste the help file or manual page content from the beginning, otherwise the results can be wrong.
The screenshot on the left shows an example of how to generate Echo module from echo’s manual page.


And the 2nd screenshot example shows the usage of help file of FSL’s BET for creating a module
Also, you can paste tab separated values to describe each parameter of the module line by line. The value order should match with the value order of the table located on the bottom of window. Here is an example of tab separated values.
In the 3rd picture, user created values in Microsoft Excel table and pasted only values (without the header) to Pipeline.
If you want to create the module manually from scratch, you can click “Switch to Classic View” button.
6.2.2 Module Suggest
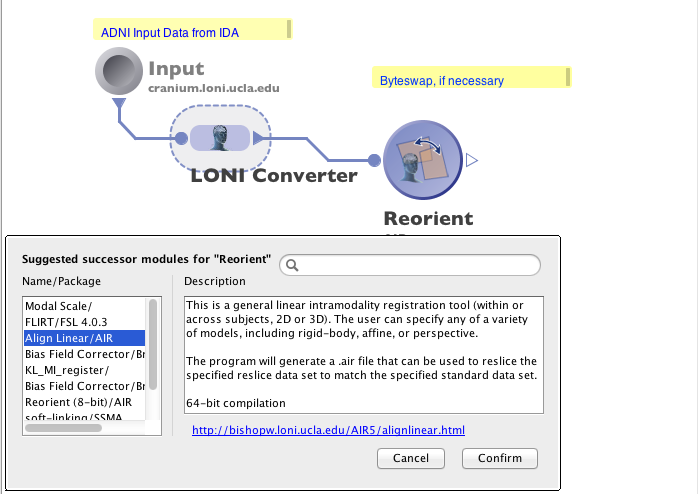
Module suggest feature allows you to check the most likely successor and predecessor modules of any given module, based on the usage history on the Pipeline server. You can right-click on any module, and choose “Suggest Successor…” or “Suggest Predecessor…”. A list of modules will be suggested, and you may click on any of them to see detailed information of that module. Upon confirmation, the module will be added to the canvas, with connections automatically drawn.
6.3 Module groups
As you continue to use the Pipeline, you will notice that your workflows are overflowing with modules. You might also have a grouping of a few modules together in many of your workflow that performs the same basic operation in all of them. In the spirit of promoting reusability and clean looking workflows, the Pipeline can represent a group of modules as a single module in a workflow. To demonstrate, let’s use an example that is a combination of multiple modules available in the LONI Pipeline server library. If you don’t have an account to the server, just follow along in the program and check the screenshots provided.
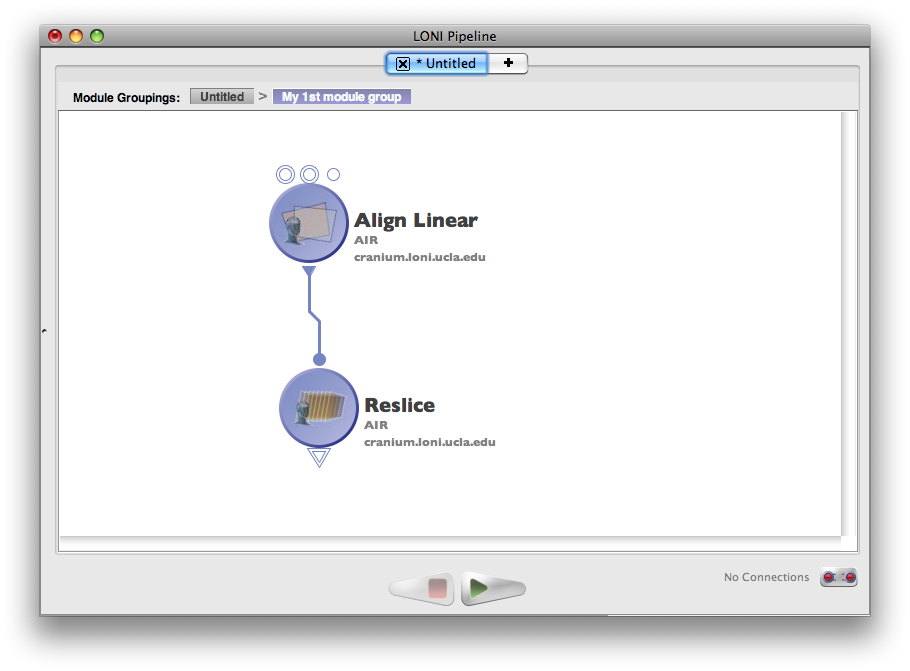
First off, make sure you’ve connected to the LONI Pipeline server before so you have the LONI library. Now we’re going to create a reusable module group that performs an image registration and reslice.
- Drag the ‘Align Linear’ and ‘Reslice AIR’ modules into a new workflow
- Connect the output of ‘Align Linear’ to the input of ‘Reslice AIR.’
- Double-click on the ‘Module Number’ parameter of ‘Align Linear’ and set it to any one of the values (doesn’t matter what you set it to for this exercise)
- Right-click on the output of ‘Reslice AIR’ and click ‘Export Parameter.’ This will make the parameter visible on the outer module group (you’ll see what that means in a second)
- Repeat step 4 on the ‘Standard Volume’ and ‘Reslice Volume’ parameters of the ‘Align Linear’ module as well.
- Now go to ‘File->Properties’ so we can fill in some info about this. Give the module group a name and a description and whatever else you want to fill in. You can even add an icon if you want. When you’re done, click OK.
- Save the workflow into your personal library directory.

 Now if we want to use this module group inside other workflows, all we have to do is open up the personal library, and drag in the module we just made (if your personal library was already open, click the refresh button in your personal library after you save the workflow for the module group to become visible). By default, it will be listed under the package name specified. If you did not specify a package name, it will be under ‘Unknown.’ Once you’ve found it, drag it into a workflow and bask in the fruits of your labor.
As you can see, only the parameters that you exported are visible on your module group. This allows you to hide the complexity of the inner modules, which is quite beneficial when you encapsulate very large and complex workflows. You could theoretically have a module group that contains dozens of modules with just a single input and ouput if you’re task allowed/benefited from it.
Now it’s nice to be able to hide all that complexity in a workflow, but sometimes you really need to get into it, so if you just double-click on a module group you’ll zoom into the module and see its contents. If you notice the clickable ‘Module Groupings’ bread crumb bar at the top of the workflow, it will let you traverse through the levels in the workflow that you’re viewing.
| Previous: 5. Execution | Table of Contents | Next: 7. Advanced Topics |